
Roses are some of the most beloved flowers in the world, admired for their elegance, fragrance, and timeless beauty. While many gardeners assume rose propagation is difficult, the truth is that roses can grow and propagate quite easily with the right approach. Among the many methods available, one surprisingly effective technique uses a common kitchen ingredient—garlic.
Yes, garlic water can be a powerful natural aid in rose propagation. It acts as both a rooting stimulator and a natural antifungal agent, increasing your chances of success and helping cuttings develop healthy root systems. This article will walk you through a simple step-by-step process to propagate roses using garlic water, making it accessible to even beginner gardeners.
Why Use Garlic Water?
Garlic contains natural compounds like allicin, which have antibacterial and antifungal properties. When applied to rose cuttings, garlic water helps protect the young stems from disease while encouraging root growth. It’s a safe, organic, and cost-effective alternative to commercial rooting hormones.
What You’ll Need:
- Fresh garlic (3–4 cloves)
- Water (1 liter)
- A blender or mortar and pestle
- A fine strainer or cheesecloth
- Rose cuttings (6–8 inches long, from healthy plants)
- Small pots or containers
- Potting soil or a well-draining mix
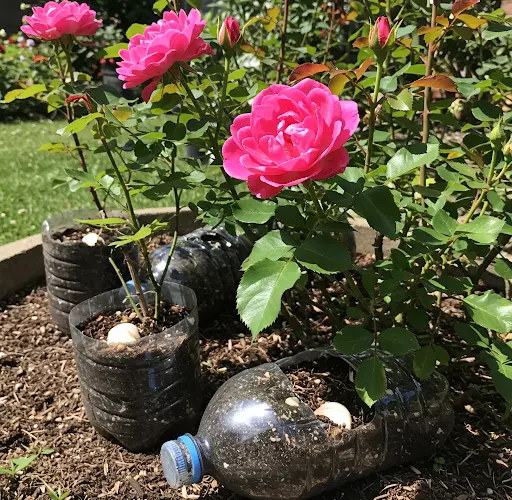
- A plastic cover or bottle to maintain humidity (optional)
Step 1: Prepare the Garlic Water
Begin by peeling 3–4 cloves of fresh garlic and blending them with one liter of clean water. If you don’t have a blender, mash the garlic using a mortar and pestle and mix it with the water manually. Let the mixture sit for 30–45 minutes to allow the garlic compounds to infuse into the water.
After the soaking period, strain the liquid through a fine mesh or cheesecloth to remove garlic pieces. This filtered garlic water will be used to treat the rose cuttings and promote root development.
Step 2: Select and Prepare Rose Cuttings
Choose a healthy rose plant with strong, semi-woody stems. Using clean, sharp pruning shears, cut 6–8 inch sections of stem that include at least three nodes (the small bumps where leaves or branches grow).
Remove any flowers, flower buds, and leaves from the lower half of the stem. Leave a few leaves on the upper portion to help with photosynthesis. The cutting should be trimmed at a 45-degree angle just below a node—this encourages better root growth.
Step 3: Soak Cuttings in Garlic Water
Place the prepared rose cuttings in a container filled with the garlic water solution. Let them soak for about 1–2 hours. During this time, the garlic water disinfects the cuttings and begins stimulating root cell activity.
Step 4: Plant the Cuttings
After soaking, plant the cuttings in small pots filled with well-draining potting soil. A mix of peat moss and perlite or sand also works well. Make a hole in the soil with a pencil or stick and gently insert the cutting about halfway into the pot.
Press the soil around the stem to secure it and water lightly to settle the mix. Avoid overwatering at this stage—just enough moisture is needed to keep the soil damp but not soggy.
Step 5: Create a Humid Environment
To help the cuttings retain moisture and prevent drying out, cover them with a clear plastic bag or a cut plastic bottle. This makeshift greenhouse helps maintain high humidity, which is crucial for root development.
Place the pots in a bright, warm location with indirect sunlight. Avoid direct sun, as it can overheat and stress the young cuttings.
Step 6: Monitor and Maintain
Check the moisture level of the soil daily, and water lightly when it begins to dry. After 2–3 weeks, gently tug on the cuttings to check for resistance—a sign that roots are beginning to form.
Once the cuttings have rooted well (typically after 4–6 weeks), they can be transplanted to larger pots or directly into your garden. Continue to care for the young rose plants with regular watering and occasional feeding to encourage healthy growth.
Final Thoughts
Propagating roses with garlic water is not only simple and inexpensive but also highly effective. The antibacterial and antifungal qualities of garlic offer protection for tender cuttings, while its natural properties promote strong root development. With patience and attention to detail, this method can yield excellent results, even for novice gardeners.
This natural approach proves that sometimes the best solutions come from the simplest ingredients. Whether you’re expanding your rose garden or starting one from scratch, this method offers a reliable path to beautiful, thriving rose plants—right from your kitchen and garden
