
Garlic is more than just a flavorful kitchen staple—it’s one of the easiest and most rewarding crops to grow at home. With minimal effort and careful timing, you can harvest bulbs that are robust, aromatic, and store well for months. Whether you grow hardneck or softneck varieties, understanding when and how to harvest garlic is key to maximizing both flavor and longevity.
This comprehensive guide walks you through everything you need to know to harvest, cure, and store garlic like a seasoned gardener.
Understanding Garlic’s Growth Cycle
Garlic is typically planted in the fall, allowing it to overwinter and develop roots and shoots slowly through the cold months. As temperatures rise in late spring and early summer, garlic enters a rapid growth phase, sending up lush green leaves and maturing its underground bulbs.
Timing is crucial: harvest too early, and the bulbs may be small and underdeveloped; wait too long, and the cloves may split, reducing shelf life and flavor. Paying attention to the plant’s leaves and growth stages is the best way to ensure a perfect harvest.
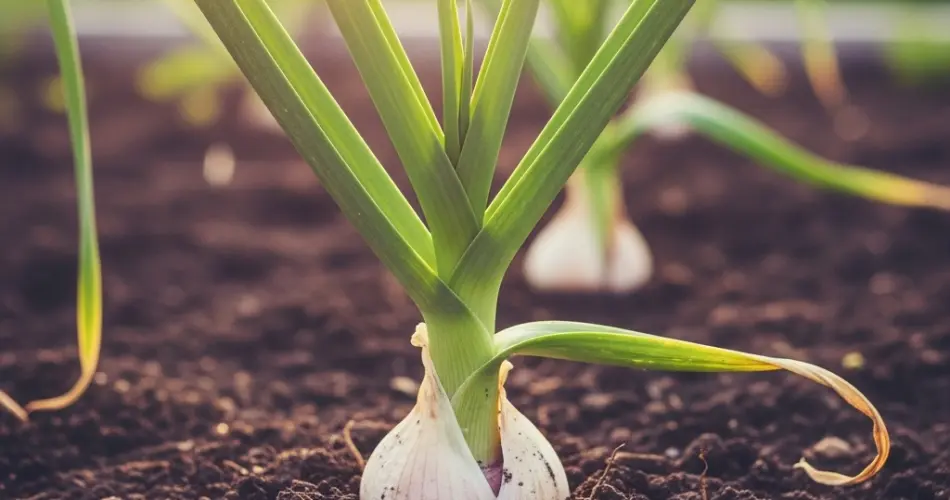
Signs Your Garlic Is Ready to Harvest
Although garlic grows underground, its leaves provide clear indicators of maturity:
- Leaf Color: The lower leaves turn brown and dry, while the upper leaves remain green.
- Leaf Count: Harvest when 3 to 5 of the bottom leaves have browned. Each leaf corresponds to a layer of protective skin on the bulb—waiting too long can result in fewer protective layers.
- Bulb Check: If uncertain, gently dig around one bulb. Well-formed cloves should be clearly defined, and the bulb should feel firm and full.
Recognizing these signs helps you harvest at peak flavor and avoid overmature bulbs.
Harvesting Garlic Properly
Once your garlic is mature, careful handling is essential to protect the bulbs and prepare them for curing.
Choose the Right Conditions: Harvest on a dry day when the soil is not soggy. Wet soil increases the risk of rot and complicates the curing process.
Loosen the Soil: Avoid pulling garlic by the stems. Instead, use a garden fork or spade to gently loosen the soil around each bulb, taking care not to pierce or damage them.
Lift Gently: Once loosened, lift the entire plant—bulb, roots, and stalk intact.
Brush Off Soil: Shake off excess dirt or brush it gently. Do not wash the bulbs, as added moisture can interfere with drying and storage.
By handling garlic with care during harvest, you protect the cloves and maintain their storage potential.
Curing Garlic for Flavor and Longevity
Curing garlic is a critical step for long-term storage and flavor enhancement. Proper curing dries the outer layers, intensifies taste, and prepares the bulbs for months of use.
Hang or Lay Out: Place garlic in a warm, dry, and well-ventilated area, away from direct sunlight. You can hang garlic in bundles or lay it flat on screens, racks, or breathable trays.
Drying Period: Allow the bulbs to cure for 2 to 4 weeks. The garlic is ready when outer skins are papery and dry, and the necks and roots feel crisp.
Trim and Clean: After curing, trim roots close to the bulb and cut stalks to about an inch above the bulb. For softneck garlic, consider braiding the stalks for storage. Only peel away the outermost layer of dirty skin if necessary—avoid exposing the cloves themselves.
Curing ensures your garlic will maintain its flavor and texture for months.
Storing Garlic for Maximum Shelf Life
Proper storage is as important as harvesting. Garlic lasts longest when kept cool, dry, and well-ventilated.
Ideal Conditions: Store at around 60°F (15°C) in a dry environment with good airflow. Avoid refrigeration, which can trigger sprouting.
Best Storage Options: Mesh bags, paper bags, or open baskets allow air to circulate. Avoid sealed containers, which trap moisture and can cause mold.
Check Regularly: Inspect stored garlic periodically and remove any bulbs that show signs of softness, mold, or decay.
With proper storage, garlic can remain flavorful and usable for 6 to 8 months or longer.
Saving Garlic for Next Season
Select the largest, healthiest bulbs from your harvest to use as seed garlic for the following season. Planting robust cloves ensures stronger plants and higher yields in the next crop.
By selecting carefully, you maintain a sustainable cycle of homegrown garlic, reducing the need to buy new seed each year.
Tips for a Successful Garlic Harvest
- Monitor Leaf Color Closely: Don’t wait until all leaves brown—harvesting too late compromises flavor and storage.
- Harvest on Dry Days: Moisture can encourage rot and fungal issues.
- Handle Bulbs Gently: Bruised or cut cloves won’t store well.
- Cure Properly: Patience during the drying period is key to long-lasting garlic.
- Rotate Plantings: Avoid planting garlic in the same spot consecutively to prevent soil-borne diseases.
Final Thoughts
Harvesting garlic at the right time and following proper curing and storage techniques ensures bulbs that are rich, aromatic, and long-lasting. Whether you’re a beginner or an experienced gardener, these steps make growing garlic a rewarding experience.
From loosening the soil with care to curing bulbs to perfection, every step contributes to stronger flavor, better storage, and a satisfying homegrown harvest. By the time you cook with your own garlic, you’ll appreciate the difference fresh, garden-grown cloves make in every meal.
Growing garlic is not just gardening—it’s a culinary investment that keeps giving, season after season.
