
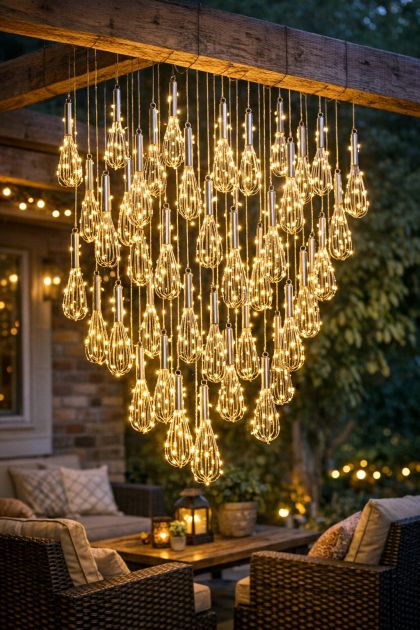
Sometimes the most stunning home décor ideas come from the most unexpected places. In this case, an ordinary kitchen tool—the humble wire whisk—becomes the centerpiece of a breathtaking outdoor light installation.
At first glance, guests assume this glowing display is a custom designer chandelier costing hundreds or even thousands of dollars. The reality? It’s made from inexpensive metal kitchen whisks, fishing line, and warm white LED fairy lights.
The result is a magical floating cloud of light that transforms any patio, pergola, porch, or outdoor seating area into an enchanting retreat.
Why This DIY Project Works So Well
Metal whisks have a naturally elegant shape that resembles:
- Hanging lanterns
- Decorative glass pendants
- Raindrops
- Modern chandeliers
When warm white fairy lights are woven through the wire loops, each whisk glows like a miniature light sculpture.
When dozens are grouped together, the effect becomes absolutely mesmerizing.
Materials You’ll Need

Main Materials
- 50 inexpensive metal kitchen whisks
- 200–300 warm white LED fairy lights
- Clear fishing line
- Wooden beam or pergola support
- Zip ties
- Small eye hooks
- Extension cords (if needed)
Optional Upgrades
- Remote-controlled fairy lights
- Solar fairy lights
- Timer plugs
- Outdoor-rated LED strings
Estimated Cost
| Item | Approximate Cost |
|---|---|
| 50 Dollar Store Whisks | $50–$75 |
| Fairy Lights | $25–$60 |
| Fishing Line | $5 |
| Hooks & Hardware | $10 |
| Total | $90–$150 |
A similar designer installation could easily cost over $500.
Step 1: Gather Your Whisks
Look for matching silver metal whisks.
The more uniform they are, the more professional the final display will appear.
Remove:
- Price stickers
- Packaging
- Hanging tags
Wash and dry them thoroughly.
Step 2: Plan Your Layout
Lay all 50 whisks on the ground.
Arrange them in a pattern such as:
Cloud Shape
Dense center with tapered edges.
Waterfall Shape
Higher on one side and lower on the other.
Chandelier Shape
Longest whisks in the middle.
The image shows a chandelier-style arrangement.
Step 3: Add Hanging Lines
Cut fishing line into varying lengths.
Suggested lengths:
- 12 inches
- 18 inches
- 24 inches
- 30 inches
- 36 inches
Tie each whisk securely.
The varying lengths create movement and depth.
Step 4: Install Support Hooks
Step 4: Install Support Hooks
Attach eye hooks beneath:
- Pergolas
- Porch ceilings
- Gazebos
- Patio beams
Space hooks evenly across the area.
Make sure the structure can safely support the weight.
Step 5: Hang the Whisks
Begin hanging the longest pieces first.
Then gradually add shorter ones around them.
Step back frequently to evaluate the overall shape.
The goal is to create a floating cluster rather than perfectly straight rows.
Step 6: Thread the Fairy Lights
This is where the magic happens.
Carefully weave warm white LED fairy lights through each whisk.
The wire loops naturally hold the lights in place.
Wrap lights around:
- The whisk handle
- Interior wire loops
- Hanging line near the whisk
Avoid wrapping too tightly.
Step 7: Hide the Wires
Use:
- Clear zip ties
- Transparent fishing line
- Beam-mounted cable clips
Hide excess cords behind beams or railings.
A clean installation dramatically improves the finished look.
Step 8: Test the Lighting
Wait until dusk.
Turn on the lights and inspect:
- Brightness
- Balance
- Shadows
- Coverage
Adjust whisk positions if needed.
The goal is a soft glowing canopy rather than a harsh spotlight effect.
Styling Ideas
Rustic Farmhouse

Combine with:
- Wooden furniture
- Lanterns
- Potted flowers
Modern Patio
Pair with:
- Black metal furniture
- Neutral cushions
- Concrete planters
Romantic Garden

Add:
- String lights
- Climbing vines
- Candle lanterns
Wedding Decor
This project also makes a spectacular:
- Wedding backdrop
- Reception centerpiece
- Outdoor ceremony decoration
Safety Tips
Always use:
- Outdoor-rated LED lights
- Waterproof extension cords
- GFCI-protected outlets
Avoid:
- Traditional incandescent bulbs
- Overloading electrical circuits
- Hanging near open flames
LED lights remain cool and are ideal for this project.
Why Everyone Thinks It’s Expensive
The beauty of this project comes from repetition.
One whisk looks ordinary.
Fifty illuminated whisks create a dramatic sculptural installation that resembles luxury lighting found in boutique hotels and high-end restaurants.
Most people never guess that the entire display started in the kitchen aisle of a discount store.
Final Thoughts
This dazzling DIY patio chandelier proves that creativity matters far more than a large decorating budget. By combining 50 inexpensive metal whisks with warm white fairy lights, you can create a glowing masterpiece that turns an ordinary outdoor space into a magical evening retreat.
The soft golden light, floating design, and unexpected materials make this one of those rare projects that guests remember long after they leave—and one that neighbors will definitely ask about every time they walk by.
