
If you love creative, budget-friendly DIY projects, this viral idea is one you won’t want to miss. A simple metal utensil holder combined with a solar garden light can be transformed into a stunning outdoor lantern in just minutes. This clever hack is spreading fast because it’s affordable, stylish, and incredibly easy to make.
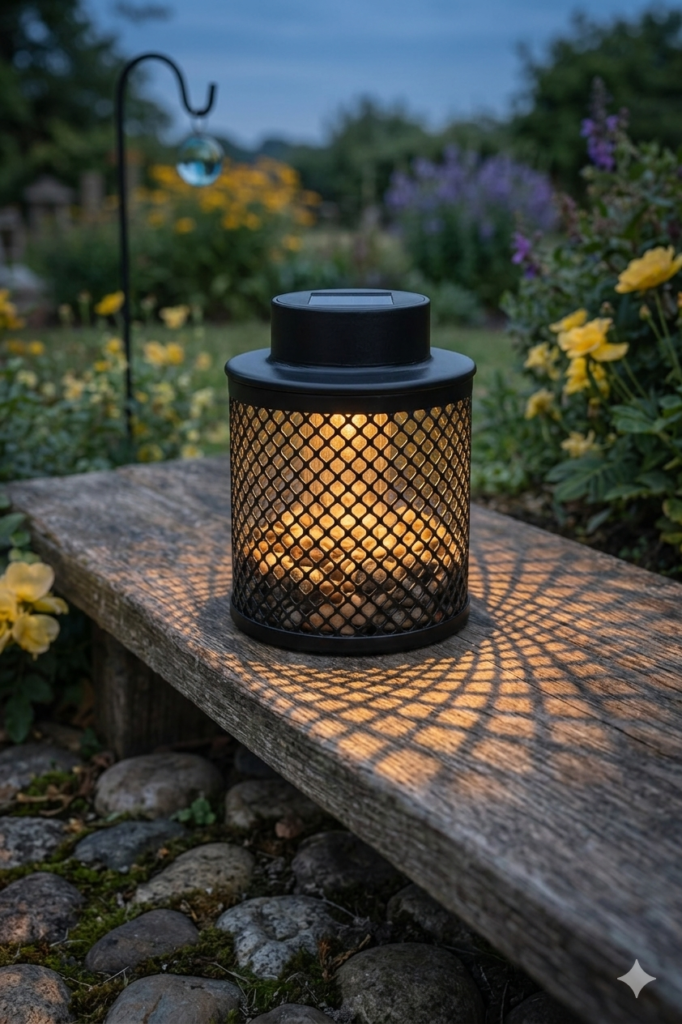
In the image, you can see a solar light being inserted into a metal utensil holder after drilling a small hole. The result is a beautiful glowing lantern that casts decorative patterns at night—perfect for any backyard or patio.
Disclaimer
This article contains affiliate links. This means that if you purchase through these links, we may earn a small commission at no additional cost to you. This helps support our content and allows us to continue sharing useful DIY ideas.
Why This DIY Idea Is So Popular
This project is trending for a reason. It combines simplicity with a high-end look, making it accessible to everyone.
Key Benefits:
- Very low cost using Dollar Store items
- No electrical wiring required
- Eco-friendly with solar power
- Quick and beginner-friendly
- Creates beautiful lighting effects
It’s the perfect way to upgrade your outdoor space without spending much.
Materials You’ll Need (With Easy Access Links)
To recreate this DIY solar lantern, you’ll need:
👉 “I’ve included some helpful links below if you want to take a look.”
- Solar garden lights (Buy here – affiliate link)
- Metal utensil holder (mesh style works best – affiliate link)
- Power drill with metal drill bit (Buy here – affiliate link)
- Spray paint for customization (optional – affiliate link)
- Decorative stones or beads (optional – affiliate link)
These items are easy to find online and will help you achieve the best results.
Step-by-Step Guide
Step-by-Step Guide
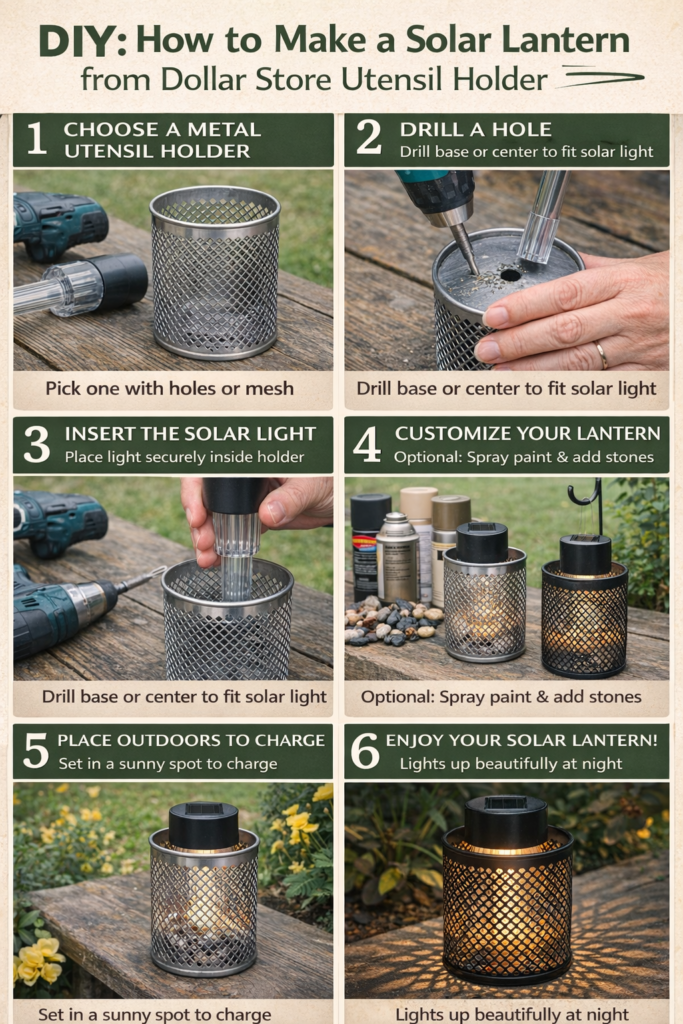
Step 1: Choose the Right Utensil Holder
Select a metal holder with holes or a mesh design. This allows the light to shine through and create beautiful shadow patterns.
Step 2: Prepare the Solar Light
Remove the stake from the solar light, keeping the top part with the solar panel and LED.
Step 3: Drill a Hole
Using a drill, create a hole in the base or center of the utensil holder if necessary so the light fits securely.
Step 4: Insert the Solar Light
Place the solar light inside the holder. Make sure the solar panel is facing upward for proper charging.
Step 5: Customize Your Lantern
You can spray paint the holder in black, gold, or white for a modern look. You can also add stones or beads inside for extra decoration.
Step 6: Place It Outdoors
Set your lantern in a sunny spot so it charges during the day and lights up automatically at night.
Recommended Tools for Best Results
If you want a more professional finish, these tools can help:
👉 “I’ve included some helpful links below if you want to take a look.”
- Heavy-duty drill kit (affiliate link)
- Waterproof solar lights (affiliate link)
- Rust-resistant utensil holders (affiliate link)
Using quality materials ensures durability, especially for outdoor use.
Creative Ideas to Customize Your Lantern
Make your DIY project unique with these ideas:
- Paint in metallic colors for a luxury look
- Hang lanterns using hooks or wire
- Line multiple lanterns along a garden path
- Combine with fairy lights for extra brightness
- Use different holder sizes for variety
Why This DIY Works So Well
The magic of this project comes from the perforated metal design. When the solar light shines through the holes, it creates stunning light patterns that instantly elevate your outdoor space.
It’s a perfect blend of function and style—without the high cost.
Best Places to Use These Solar Lanterns
- Garden walkways
- Patio or balcony
- Outdoor dining areas
- Backyard décor
- Entryways
They create a warm, inviting atmosphere wherever you place them.
Final Thoughts
This DIY solar lantern idea proves that you don’t need expensive décor to create something beautiful. With just a utensil holder and a solar light, you can design a stylish and functional piece that enhances your outdoor space.
Ready to Try This DIY?
Get started today with these materials:
- Solar lights (affiliate link)
- Utensil holders (affiliate link)
- Drill set (affiliate link)
This simple project can completely transform your backyard—give it a try and see the results for yourself!
