
Grafting is one of the most useful skills in tree growing. It allows you to join part of one tree to another so they grow as a single plant. Gardeners and orchard growers use grafting to improve fruit quality, control tree size, repair damage, preserve favorite varieties, and produce trees that are stronger or better suited to local conditions.
At first, grafting can seem technical, but the basic idea is simple: you take a piece of a desired tree and attach it to a compatible root system. If the tissues line up properly and heal together, the two parts become one living tree.
What grafting is
A grafted tree has two main parts.
The rootstock is the lower part. It provides the roots and often influences vigor, size, disease resistance, soil adaptability, and cold hardiness.
The scion is the upper part. This is the variety you want to grow for its fruit, flowers, or other qualities.
In some cases, there is also an interstem, a short middle section placed between the rootstock and scion to help with compatibility or size control.
Grafting works because the thin growing layer just under the bark, called the cambium, can heal and connect when the cut surfaces are matched closely and kept alive long enough to join.
Why graft trees
Grafting is used for several important reasons.
The most common reason is to preserve a variety exactly as it is. Seeds do not usually grow into a tree identical to the parent, especially with fruit trees like apples, pears, peaches, and plums. If you want the same fruit as a known tree, grafting is the reliable way to copy it.
It is also used to control tree size. A dwarfing or semi-dwarfing rootstock can keep a fruit tree smaller, which makes pruning, spraying, and harvesting easier.
Growers graft to improve adaptation too. A good rootstock may handle poor soil, drought, wet conditions, pests, or cold better than the variety would on its own roots.
Another reason is faster fruiting. Trees grown from seed can take many years to mature. Grafted trees usually bear fruit sooner because the scion comes from mature wood.
Grafting can also help with repair and renovation. Damaged trunks can sometimes be bridge-grafted, and old trees can be top-worked with new varieties instead of being removed.
Main benefits of grafting
Grafting offers both practical and economic advantages.
It helps you:
- reproduce a tree exactly
- change a tree to a better variety
- combine strong roots with high-quality fruit
- control height and spread
- improve disease or stress tolerance
- shorten the wait for production
- save space by growing multiple varieties on one tree
For home gardeners, one of the biggest benefits is flexibility. A single established tree can sometimes be converted to a new variety or even carry several compatible varieties at once.
Which trees are commonly grafted
Fruit trees are the most common candidates. Apples and pears are among the easiest for beginners. Plums and cherries can also be grafted successfully. Peaches and apricots are often grafted too, though timing becomes more important.
Many ornamental trees are grafted as well, especially weeping, dwarf, or unusual forms that do not come true from seed.
Compatibility matters. In general, grafting works best between plants that are closely related. Apple varieties usually graft onto apple rootstocks. Pears onto pear rootstocks. Stone fruits may have some compatible combinations, but not all of them work well or last long.
When to graft trees
Timing depends on the method and the species, but the best period for many tree grafts is late winter to early spring, just before or as growth begins.
This is a good time because:
- the scion wood is still dormant
- the rootstock is beginning to become active
- healing starts quickly as temperatures rise
For many common grafting methods:
- Whip-and-tongue grafting is often done in late winter or early spring on young wood.
- Cleft grafting is usually done in early spring, especially for top-working larger branches.
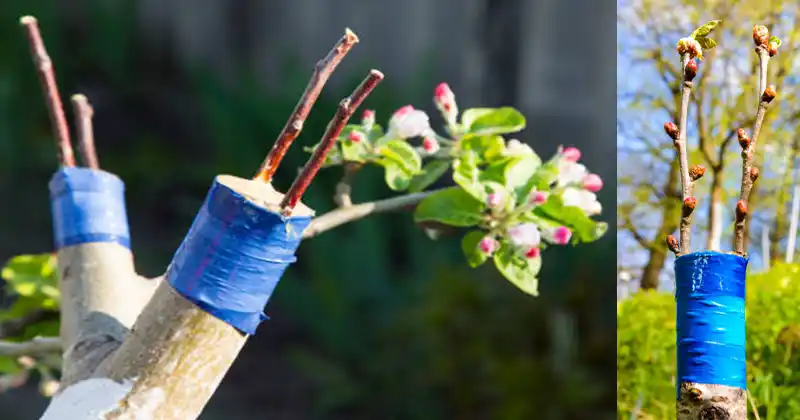
- Bark grafting is done when the bark is “slipping,” meaning it separates easily from the wood in spring.
- Bud grafting or budding is usually done in summer when the bark lifts well and buds are mature.
Scion wood is often collected in winter while fully dormant and stored cool and slightly moist until use.
Tools and materials you need
You do not need a huge kit, but you do need clean, sharp tools.
Useful supplies include:
- a very sharp grafting knife or pruning knife
- hand pruners
- a small pruning saw for larger wood
- grafting tape, budding rubber, or stretch film
- grafting wax or sealant, depending on the method
- labels and a marker
- rubbing alcohol or disinfectant to clean tools
Sharpness matters because smooth cuts heal better than ragged ones.
Basic principles for successful grafting
No matter which technique you use, success depends on a few core rules.
First, the scion and rootstock must be compatible.
Second, the cambium layers must touch. Perfect matching across the whole cut is not always possible, especially if the diameters differ, but at least one side should line up well.
Third, the graft must be held firmly so the cut surfaces do not move.
Fourth, the union must be protected from drying out. Fresh cuts lose moisture quickly, and desiccation is one of the main reasons grafts fail.
Fifth, use healthy wood. Weak, diseased, frozen, or damaged material lowers the odds.
How to do a simple graft
For beginners, a whip graft or cleft graft is often the most practical place to start. Here is a simple overview.
1. Select the rootstock
Choose a healthy, compatible rootstock. It should be vigorous, disease-free, and appropriate for your soil and climate.
2. Collect scion wood
Take one-year-old shoots from a healthy tree you want to copy. Good scion wood is usually pencil-thick, firm, and dormant if you are doing spring grafting. Cut pieces with two to four buds.
3. Keep scion wood dormant
Wrap it so it stays slightly moist, then store it in a refrigerator or similarly cool place until grafting time. Do not let it dry out or mold.
4. Make clean cuts
Using a sharp knife, make smooth cuts on both scion and rootstock according to the graft type.
For a whip-and-tongue graft, both pieces should be about the same thickness. You make matching sloping cuts, then a small tongue in each, and fit them together.
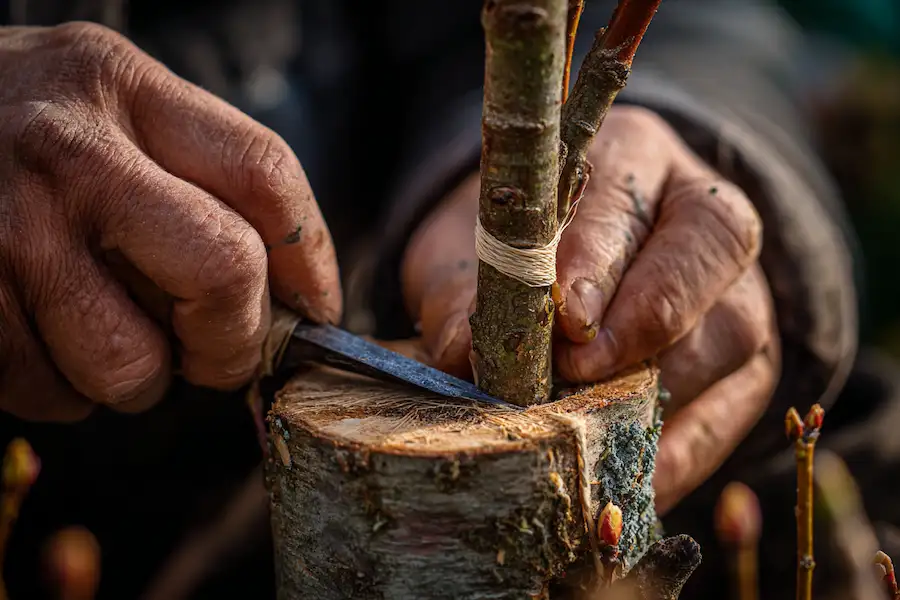
For a cleft graft, you cut off a branch or trunk section, split it carefully, and place one or two wedge-shaped scions into the split so the cambium lines up.
5. Join the pieces
Fit the scion tightly to the rootstock. This is the critical step. Even a good cut will fail if the cambium layers are not aligned.
6. Wrap securely
Use grafting tape or similar material to hold the union firmly. The graft should not wiggle.
7. Seal exposed areas
Apply wax or sealant where needed to reduce drying, especially on larger grafts.
8. Label the graft
Write down the variety and date. This becomes surprisingly important once you have more than one tree or one graft.
9. Provide aftercare
Protect the tree from stress. Remove shoots that grow from the rootstock below the graft. Watch for drying, infection, and breakage. Support vigorous new growth if wind is a risk.
Common grafting methods
Whip-and-tongue graft
Best for young rootstocks and scions of similar thickness. It gives a strong union and a lot of cambium contact. It is one of the best methods for bench grafting young fruit trees.
Cleft graft
Useful for changing the variety of an existing tree or branch. It works well when the rootstock or branch is much thicker than the scion.
Bark graft
Good for top-working larger branches in spring when bark separates easily. It is often used to change varieties on established trees.
Bud grafting
Instead of using a piece of stem, you use a single bud. This method is efficient and common in nurseries, especially for fruit and ornamental trees.
Side graft and veneer graft
Often used for ornamentals and evergreens. These methods are more specialized but very useful in nursery work.
Aftercare: what happens after the graft
A graft is not finished when it is tied. Aftercare can determine whether it thrives or fails.
The scion may stay dormant for a while, then begin to push buds once the union starts healing. During this period:
- keep the tree watered but not waterlogged
- protect it from strong sun if the climate is harsh
- prevent shoots below the graft from taking over
- check ties so they do not girdle the growing stem
- support new growth if it is long and tender
Once the graft is clearly established, remove or loosen wrapping if the material is not self-degrading. A strong new shoot can break off in wind if it is not supported, so staking may help.
What to avoid
Many graft failures come from a few repeated mistakes.
Avoid using incompatible species or rootstocks. Even if a graft appears to take at first, poor compatibility may lead to weakness or delayed failure.
Avoid dry scion wood. If the scion dries before healing, it will not survive.
Avoid dirty tools. Disease can spread easily through cuts.
Avoid rough or crushed cuts. Clean cuts heal much better.
Avoid poor cambium alignment. This is probably the most common technical error.
Avoid grafting at the wrong time. If the rootstock is not physiologically ready, healing is poor.
Avoid letting rootstock suckers grow unchecked. They can outcompete the scion.
Avoid wrapping too loosely or too tightly. Loose unions move and fail; overly tight wraps can damage growing tissue.
Avoid using weak, diseased, insect-damaged, or stressed plant material.
Avoid leaving large exposed cuts unsealed when the graft type requires protection.
Signs a graft is succeeding
You can often tell a successful graft by a few encouraging signs:
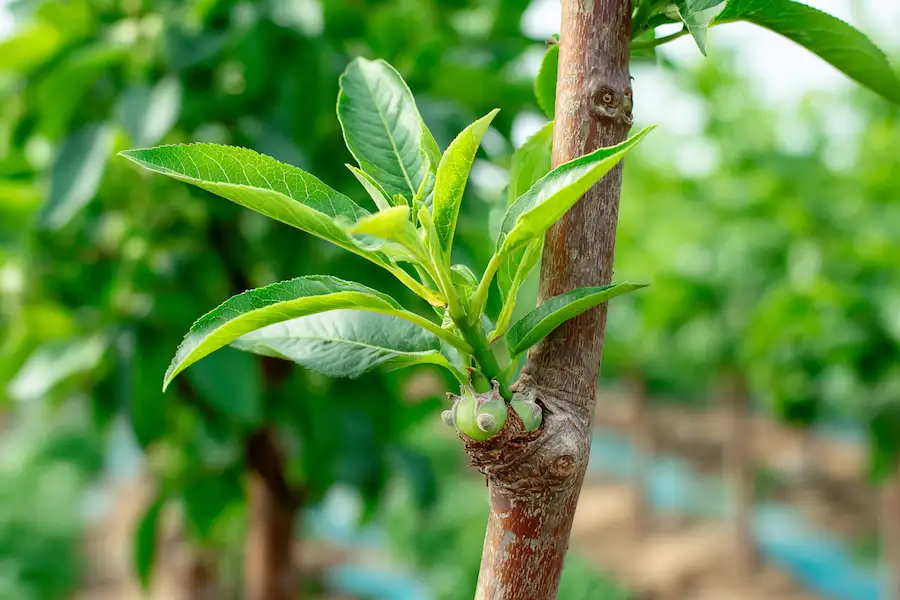
- buds on the scion begin to swell and open
- the scion stays green and firm
- callus tissue begins forming around the union
- growth starts from scion buds, not just from the rootstock
Be careful, though. Sometimes stored energy in the scion can push brief growth even if the graft has not truly healed. Continued healthy growth is the real sign.
Signs a graft is failing
A failed graft often shows:
- shriveled or blackened scion wood
- dry buds that never open
- loose union
- discoloration or rot at the cut surfaces
- strong rootstock growth below the graft with no lasting scion growth
Failure is normal when learning. Even experienced grafters do not get a 100 percent success rate every time.
Practical tips for beginners
Start with easy species, especially apples or pears.
Practice making smooth cuts on spare branches before working on your real materials.
Match diameters closely when possible.
Do a few grafts rather than just one, since success rates improve with numbers.
Label everything clearly.
Work quickly enough that cuts do not dry out, but not so fast that you lose accuracy.
Keep notes on timing, method, weather, and results. You will improve faster if you compare what worked and what did not.
Can you graft different fruits onto one tree?
Sometimes, yes. Closely related varieties of the same species are the safest choice. Multiple apple varieties can often be grafted onto one apple tree. Some stone fruit combinations are possible too, depending on compatibility.
This can be useful for saving space, extending harvest season, and improving pollination. But managing balance matters. One variety may grow much more strongly than another, so pruning becomes important.
Is grafting better than growing from seed?
For most named fruit varieties, yes. Seed growing is useful for breeding, rootstock production, or experimentation, but it does not reliably reproduce the parent variety. Grafting is the preferred method when you want predictable fruit quality and performance.
Grafting is both a science and a craft. The science is in plant compatibility, cambium contact, dormancy, and healing. The craft is in the cut, the timing, and the care you take with living material.
For a home gardener, grafting opens the door to preserving old family trees, upgrading poor varieties, saving space, and gaining more control over the orchard. For a grower, it is one of the most powerful propagation tools available.
The best way to learn is to start with a simple method, use healthy wood, pay attention to timing, and practice. A first graft may feel awkward, but once you see one take and grow, the process becomes much easier to understand.
