
Propagating fig trees from cuttings is one of the easiest and most successful ways to multiply your favorite fig variety. Every single fig branch contains dormant “rooting” cells. By creating the right conditions, you can trick a simple stick into becoming a new tree, genetically identical to its parent.
While figs are tough, their success in the propagation stage depends on following very specific rules that prevent rot and help new roots establish quickly. This guide breaks down those steps into easy-to-digest instructions, focusing on practical home techniques.
1. Selecting the Ideal Cutting
Your choice of material is the first and most critical step. Success relies on selecting healthy, vigorous wood.
- The Best Wood: Choose “hardwood”—this is wood grown during the previous year. It should be brown or grayish, not soft green growth.
- Ideal Thickness: The cutting should be approximately the thickness of a pencil or your pinky finger.
- The Season: Cuttings are best taken when the tree is dormant (late winter or very early spring), just before it wakes up for the season.
- Zero Leaves: The cutting must not have any large leaves attached. Leaves lose too much moisture, which will dehydrate the cutting before it grows roots. If your cutting has leaves, prune them all off.
2. Preparing and Shaping the Cutting
The way you cut and shape your stick determines where the roots grow and keeps the plant from getting confused.
What is a “Node”? A node is one of the small, raised bumps you see on the bark. It is the “brain” of the stem. From these nodes, a fig will grow either roots (if buried) or leaves (if exposed).
- Step 1: Determine the Top and Bottom. To thrive, the cutting must be planted upright. If you plant a fig upside down, it will almost certainly fail.
- Step 2: The Top Cut. At the top of your cutting, make a clean, horizontal (flat) cut about half an inch above a node.
- Step 3: The Bottom Cut (45° Angle). At the bottom of the cutting, make a sharp, angled cut (about 45 degrees) just below a node. This slanted cut increases the area where roots can emerge and makes it obvious which end is the bottom.
- Cutting Size: The ideal cutting is 6 to 10 inches long and should have at least 3 to 5 total nodes.
3. Rooting Agents and Sealing
You can increase the chances of success with a few extra (but easy) steps.
Rooting Compounds: Figs root very easily, but they often need help signaling the dormant cells to begin.
- Honey (Good): Honey has antibacterial properties that keep the stem end healthy. It is better than nothing, but it is a weak rooting hormone.
- Commercial Hormone (Best): A powdered or gel rooting hormone (available at any garden center) is much more effective. It chemically signals the dormant cells to grow roots much faster. Dip the angled bottom cut into water, then into the hormone, before planting.
Sealing the Top: The open wound at the flat top cut is the number one way a cutting loses its internal moisture. You must seal it. Simply melt some candle wax and drip it onto the flat top surface, or use a small blob of wood glue or a commercial tree wound paint. This keeps the moisture locked inside the stick.
4. The Critical Potting Setup (Beginner Mistakes to Avoid)
This is where most beginners go wrong. Following these strict setup rules is vital for survival.
- Rule 1: One Cutting, One Pot (MANDATORY). It is absolutely essential that each cutting has its own individual container. Do not plant multiple cuttings together in one big pot. Even if they all root successfully, their new roots will quickly become a dense, tangled, inseparable mess. When you eventually try to pull them apart to transplant them, you will rip the fragile new roots, killing your success. Use small pots or even 16-ounce clear plastic cups (with drainage holes poked in the bottom).
- Rule 2: Use Sterile “Soil.” Never use regular garden soil or dense potting mix. They are too heavy and packed with pathogens that cause immediate rot. Fig cuttings must have maximum drainage and airflow. The best rooting medium is sterile.
- Pure sand (coarse or “builder’s sand,” not fine beach sand).
- Pure perlite (the white, light “popcorn” stones).
- A 50/50 mix of perlite and peat moss.
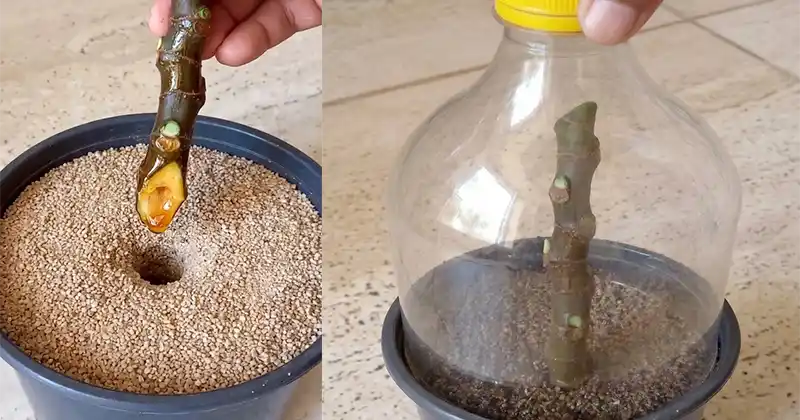
- Rule 3: Planting Depth. Dig a hole (a pencil works great for this) and gently slide the cutting in. Plant it deep, ensuring that at least two nodes are buried under the moist sand/perlite, and one or two nodes remain exposed above the surface.
5. Creating a “Mini-Greenhouse”
Since the cutting has no roots, it cannot “drink” water. It must live off the water already inside its wood. Humidity is the key to stopping it from dehydrating.
- The Setup: After watering your container (so it is moist, never swampy), you must create a humidity dome. A large plastic clear water bottle with the very bottom cut off makes a perfect dome. Push this bottle dome into the sand over the top of your cutting.
- How to Check: In a perfect setup, you should soon see condensation forming on the inside of the clear plastic dome. This means your humidity is correct.
6. Maintenance and Monitoring
- Light: Place your setup in a bright location but completely out of direct sunlight. Direct sun will create a “baking” effect under the plastic dome, cooking your cutting in hours. Bright ambient light (like an eastern or northern window) is ideal.
- Temperature: Maintain warm, consistent conditions (between 65°F and 75°F).
- Venting: If the air inside feels stagnant or if you see the slightest sign of mold, lift the plastic dome for 10-15 minutes every few days to allow fresh air to circulate, then put it back.
- Patience: Roots usually begin forming in 3 to 6 weeks. You will know it is successful when leaves begin to sprout from the exposed nodes. A very gentle tug on the stick can confirm it: if you feel resistance, roots have successfully “grabbed” the sand.
