
Sometimes the most eye-catching home décor doesn’t come from expensive stores—it comes from simple, creative ideas. One DIY trend that’s quickly gaining attention involves something you probably already have or can find cheaply: rubber doormats.
In this clever project, a woman took ordinary rubber doormats, painted them black, and mounted them onto distressed wooden frames. The result? A set of elegant, high-end looking wall panels that instantly elevate any patio or outdoor space.
✨ Why This Idea Is Going Viral
At first glance, it’s hard to believe that these decorative panels started as basic doormats. But that’s exactly what makes this idea so appealing.
- It looks luxurious and custom-made
- It’s budget-friendly
- It’s easy enough for beginners
- It works beautifully for patios, balconies, and gardens
The intricate patterns found in many rubber mats mimic expensive metal or carved wood designs—perfect for stylish outdoor décor.
🧰 What You Need to Get Started
To recreate this look, you’ll need just a few materials:
- Rubber doormats with decorative patterns
- Wooden frames (or reclaimed wood)
- Black paint (matte or satin works best)
- Strong adhesive or glue
- Sandpaper (for the distressed effect)
Many people start with patterned rubber mats like these (https://amzn.to/4tf0gMI), which already have beautiful cut-out designs that stand out once painted.
For the frame, pre-made wooden frames (https://amzn.to/4bwWc4o) or reclaimed wood pieces can both work depending on the style you prefer.
🎨 Step-by-Step Transformation
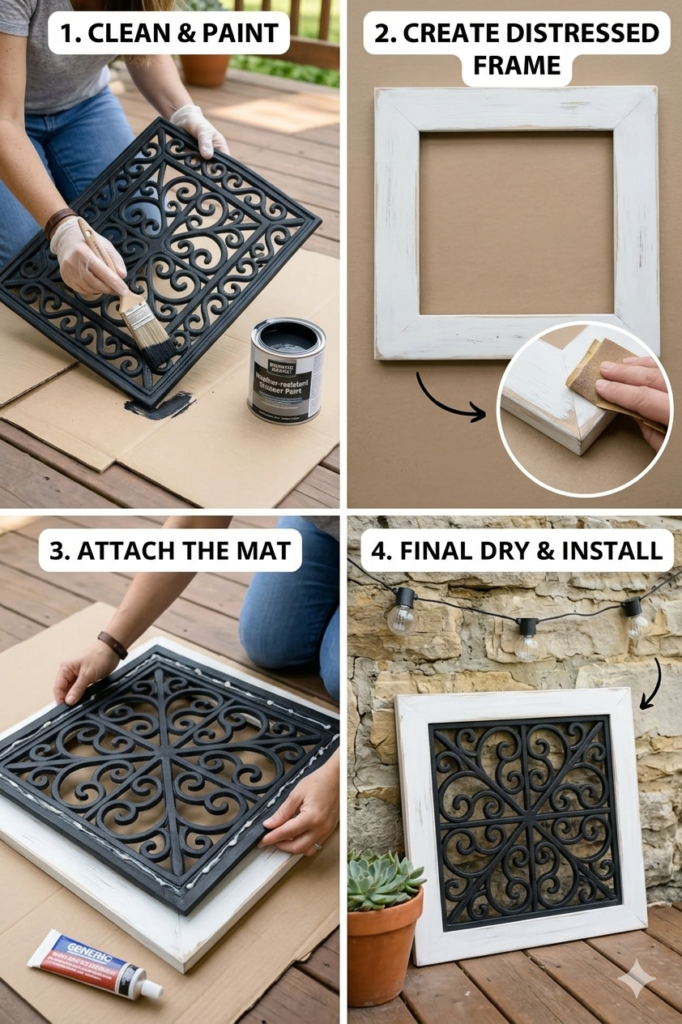
1. Paint the Doormats
Start by cleaning the mats thoroughly. Then apply black paint evenly across the surface.
👉 A weather-resistant outdoor paint (https://amzn.to/484Xu4f) is often used so the finish lasts longer outside.
The black color gives the mats a bold, modern look and highlights their patterns.
2. Create the Distressed Frame
If you’re going for a rustic style, lightly sand the wooden frame after painting or staining it.
This creates that aged, vintage look that contrasts beautifully with the dark mat.
3. Attach the Mat to the Frame
Using a strong adhesive, carefully glue the painted mat onto the wooden frame.
👉 Many DIYers use heavy-duty glue like this (https://amzn.to/4bRpmds) to make sure everything stays secure, especially outdoors.
4. Let It Dry and Set
Allow the piece to dry completely before hanging or placing it outside.
🌿 The Final Look
🌿 The Final Look
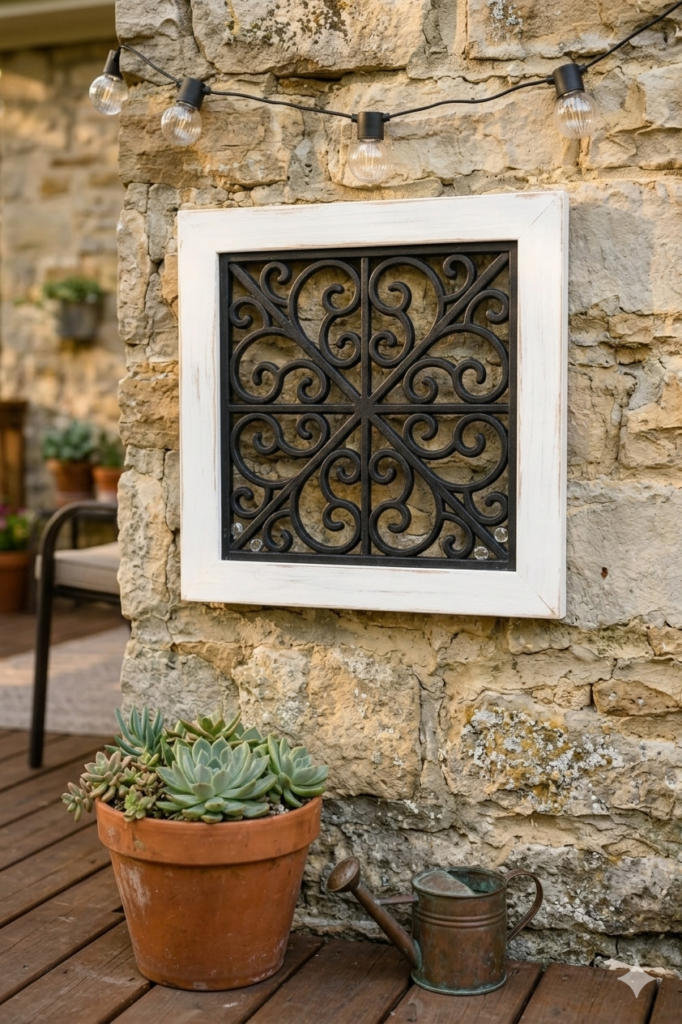
Once finished, the transformation is incredible.
What used to be a simple doormat now looks like:
- Elegant wall art
- Decorative outdoor panels
- A statement piece for patios
Hung on a wall or fence, these framed designs create texture, depth, and visual interest—without the high price tag.
🪄 Creative Ways to Use This Idea
- Hang multiple panels side by side for a gallery effect
- Use them as a backdrop for outdoor seating areas
- Place them near plants for a cozy garden vibe
- Lean them against a wall for a relaxed, modern look
💡 Why People Love This DIY
✔ Affordable Upgrade
You can transform your patio without spending a fortune.
✔ Unique Design
Each piece is customizable depending on the mat and frame you choose.
✔ Durable
Rubber mats are made for outdoor use, making them perfect for patios.
✔ Beginner-Friendly
No advanced tools or skills required.
Affiliate Disclaimer
Some links in this article are affiliate links. This means that if you click on a link and make a purchase, I may earn a small commission at no additional cost to you. These links are included naturally to help you find materials mentioned in the project, and only relevant products are referenced.
✨ Final Thoughts
This simple DIY proves that creativity can turn everyday objects into something truly beautiful. By combining rubber doormats and wooden frames, you can create stunning patio décor that looks far more expensive than it actually is.
It’s easy, affordable, and endlessly customizable—which is exactly why so many people are now trying it for themselves.
