
The Viral DIY Garden Decoration Everyone Is Talking About!
If you thought pool noodles were just for the pool… think again. This creative DIY trend is taking over social media: turning cheap pink pool noodles into adorable giant bunny decorations for your front yard.
These eye-catching bunny sculptures are fun, budget-friendly, and perfect for Easter, spring decor, or even kids’ parties. Best of all? You can make them yourself in just a couple of hours.
In this detailed, SEO-friendly guide, you’ll learn exactly how to recreate these viral pool noodle bunnies step by step—plus smart tips and affiliate-ready product suggestions.
🌸 Why This DIY Bunny Idea Is Going Viral
This trend is everywhere right now because:
- ✔️ Super affordable (uses dollar-store materials)
- ✔️ Easy to build (no advanced DIY skills needed)
- ✔️ Perfect for seasonal decor (especially Easter & spring)
- ✔️ Customizable (size, color, facial features)
- ✔️ Huge visual impact for your front yard
It’s the kind of project that makes neighbors stop and ask: “Where did you buy that?”
🛠️ Materials You’ll Need
To create one bunny (adjust for more):
- 5–7 pink pool noodles
- 1 tall wooden stake (5–7 feet)
- Zip ties or strong adhesive
- Hot glue gun
- Small white foam ball (for nose)
- Black pipe cleaners or wire (for whiskers)
- Utility knife or scissors
🛒 Recommended Supplies (Affiliate Picks)
To make your project easier and longer-lasting, here are some helpful tools:
- 👉 Pool Noodles (thick & durable): You can find great options on Amazon
- 👉 Wooden Garden Stakes (weather-resistant): Available online here
- 👉 Heavy-Duty Zip Ties (outdoor use): Check current price
- 👉 Hot Glue Gun Kit: Highly recommended for strong hold
- 👉 Foam Craft Balls for Bunny Nose: Easy to find here
(Tip: Choosing UV-resistant materials helps your bunny last all season.)
🧩 Step-by-Step Instructions
TO CONTINUE READING THE ARTICLE PLEASE SEE PAGE 2
🧩 Step-by-Step Instructions
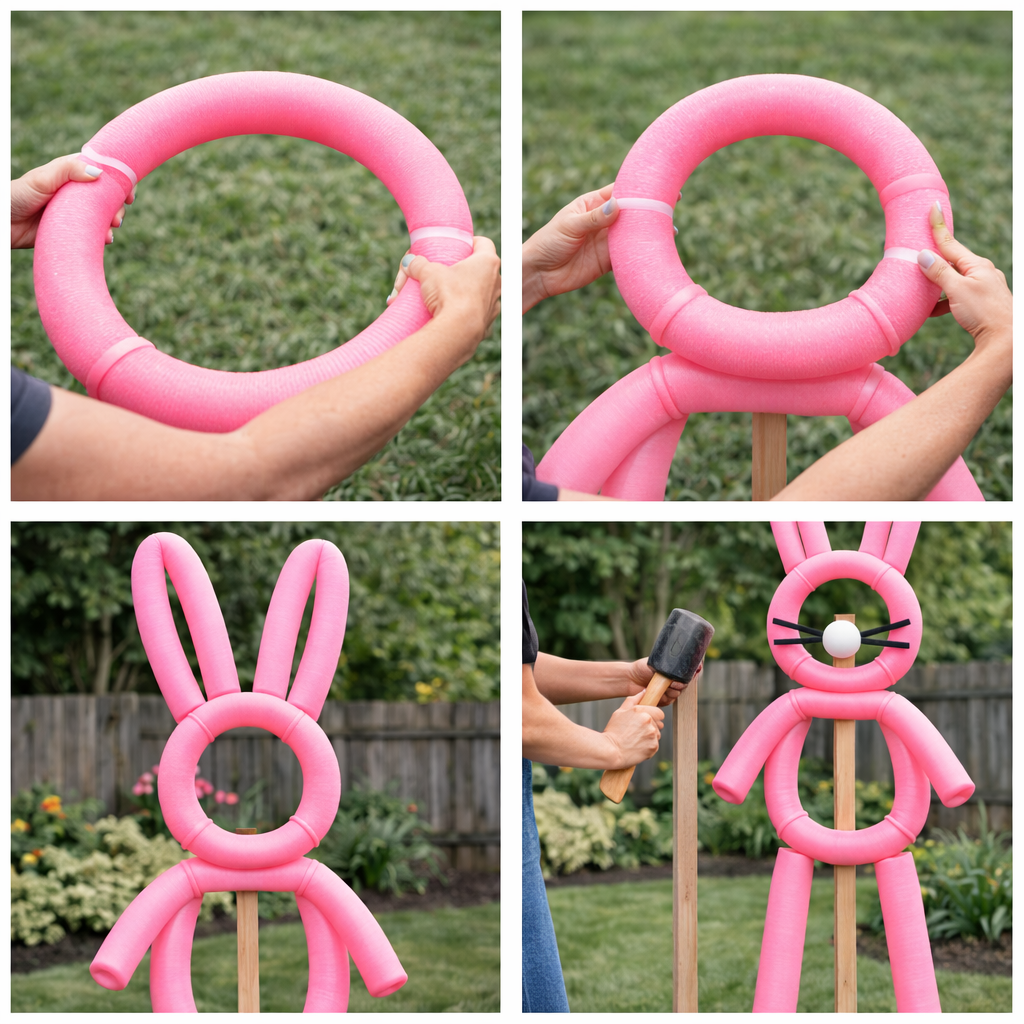
🥕 Step 1: Build the Bunny Body
- Take one pool noodle and form a large circle
- Secure the ends using zip ties or glue
- This will be the bunny’s belly
🐰 Step 2: Create the Head
- Form a smaller circle using another noodle
- Attach it above the body circle
- Make sure it’s centered and stable
👂 Step 3: Shape the Ears
- Cut a pool noodle in half
- Bend each piece into a loop to form ears
- Attach both ears to the top of the head
💪 Step 4: Add Arms and Legs
- Cut noodles into shorter pieces
- Attach two arms on the sides of the body
- Add two longer pieces at the bottom for legs
🪵 Step 5: Secure to Wooden Stake
- Insert the wooden stake through the center (head to legs)
- This provides structure and keeps the bunny upright
- Push the stake firmly into the ground
🎨 Step 6: Add the Face
- Glue a white foam ball in the center for the nose
- Attach black pipe cleaners as whiskers
- Optional: draw or stick eyes
✨ Step 7: Final Adjustments
- Straighten all parts
- Tighten zip ties if needed
- Make sure the bunny stands securely
🎨 Creative Variations to Try
Make your bunny even more unique:
🌈 Change Colors
- White for a classic bunny
- Blue or purple for a fun twist
- Pastels for Easter vibes
💡 Add Lights (Highly Recommended!)
Wrap LED string lights around the bunny for a glowing nighttime effect.
👉 Outdoor Fairy Lights: You can easily get them on Amazon
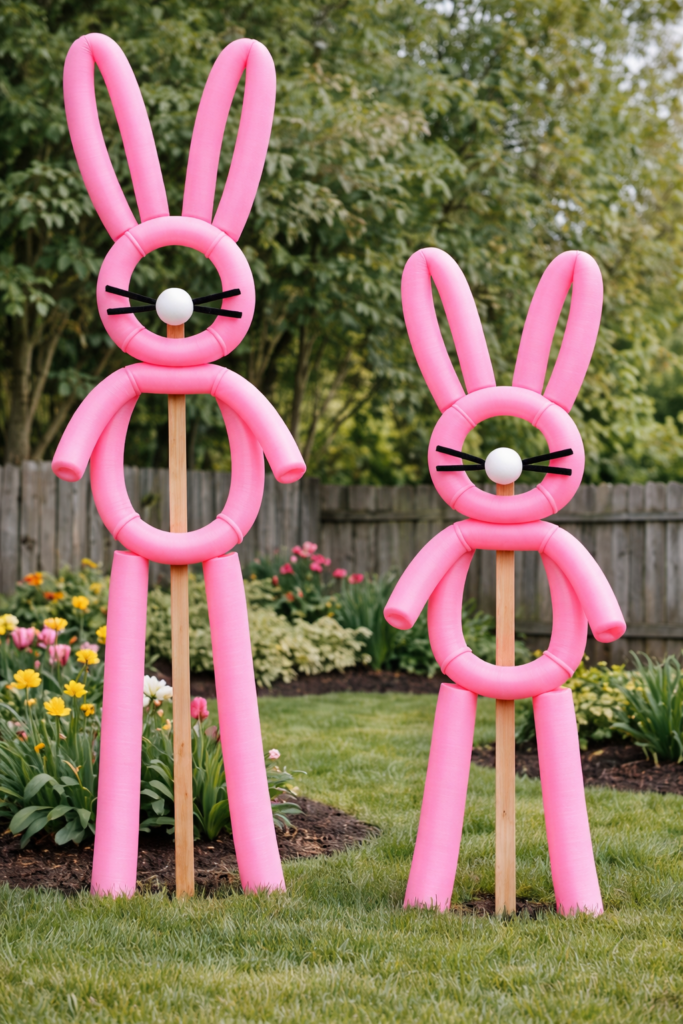
👨👩👧 Create a Bunny Family
- Make different sizes (tall + small like in the image)
- Perfect for storytelling and decoration
💡 Pro Tips for Best Results
- Use thicker noodles so they don’t bend too much
- Always secure joints with both zip ties + glue
- Place in soft soil for easier installation
- Keep away from extreme heat to avoid warping
Affiliate Disclaimer
This article may contain affiliate links. This means that if you click on a link and make a purchase, I may earn a small commission at no extra cost to you. I only recommend products that I genuinely believe will help you complete this project successfully.
🏡 Final Thoughts
This pool noodle bunny DIY proves that you don’t need expensive decorations to create something amazing. With just a few simple materials, you can turn your yard into a fun, welcoming space that stands out instantly.
Whether you’re decorating for Easter, hosting a party, or just love creative outdoor ideas—this project is definitely worth trying.
