
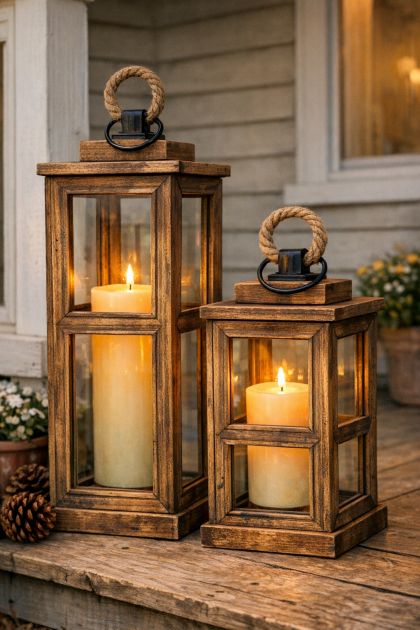
There’s something incredibly satisfying about turning inexpensive materials into beautiful home décor. This clever DIY project transforms ordinary dollar-store or thrift-store wooden picture frames into stunning lantern-style boxes that look like they came straight from a high-end home décor catalog.
The finished lanterns add warmth, charm, and a cozy farmhouse feel to any front porch, patio, or garden space. Best of all, they cost only a fraction of what similar store-bought lanterns would cost.
Why This DIY Project Is So Popular
Wooden lanterns are a favorite decorating trend because they:
- Add instant curb appeal
- Create a warm and inviting atmosphere
- Work in every season
- Look expensive but are inexpensive to make
- Can be customized with paint or stain
- Make excellent gifts
The secret is simple: picture frames already provide the perfect structure for lantern walls. By gluing them together into a square shape, you create a beautiful lantern body with very little woodworking required.
Materials You’ll Need

For One Lantern
- 4 wooden picture frames (same size)
- Wood glue
- Hot glue gun (optional)
- Small plywood or wood piece for the base
- Small wood piece for the top
- Sandpaper
- Wood stain or paint
- Clear protective sealer
- Decorative rope handle (optional)
- Metal ring pull (optional)
- LED candle or pillar candle
Tools
- Clamps
- Paintbrush
- Measuring tape
- Drill (optional)
Step 1: Choose Your Picture Frames
Look for inexpensive wooden frames at:
- Dollar stores
- Thrift shops
- Garage sales
- Craft stores
Remove any glass, backing, and hardware so you’re left with just the wooden frame.
Make sure all four frames are identical in size.
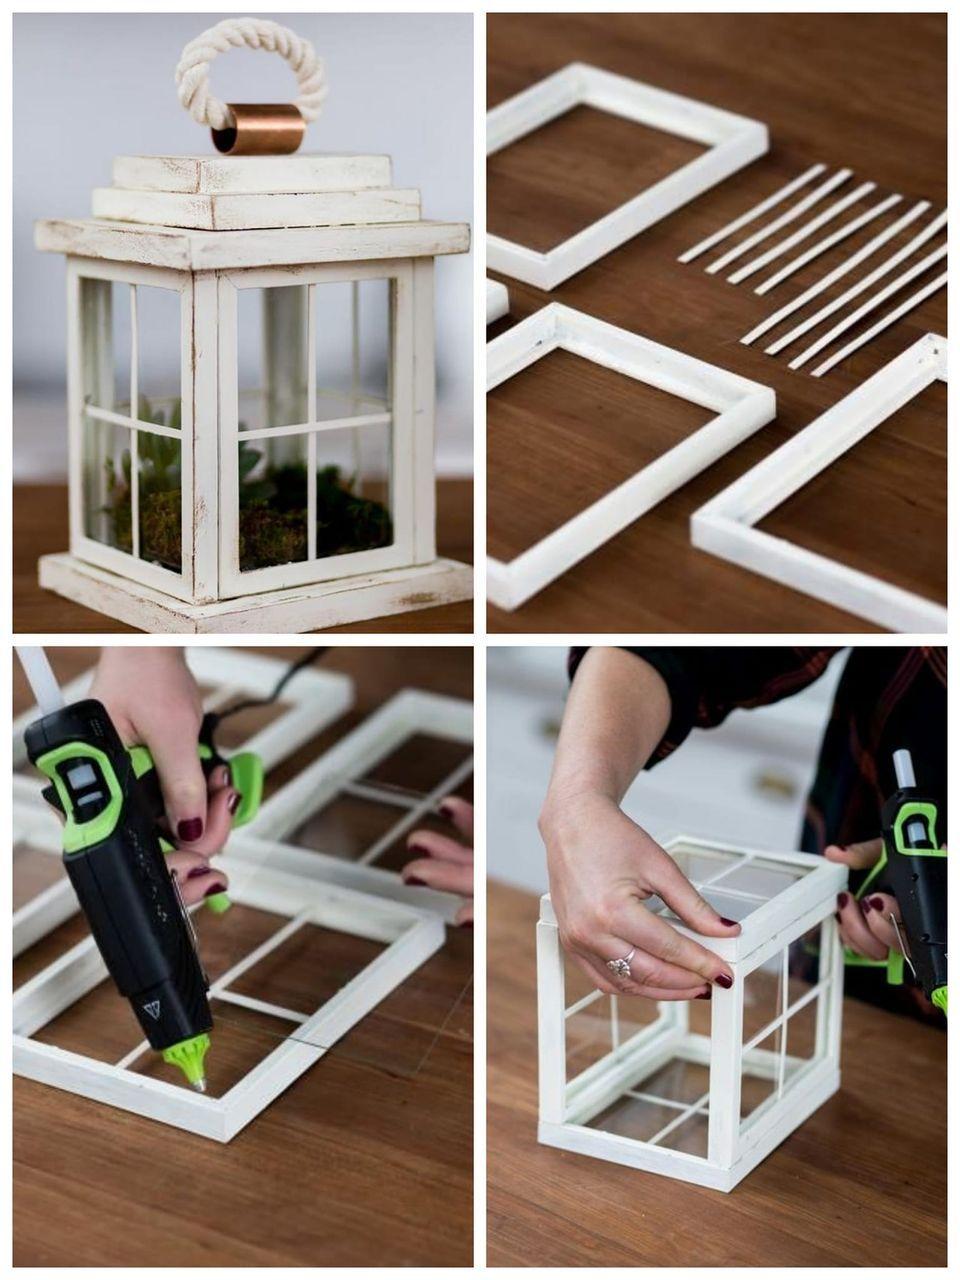
Step 2: Create the Lantern Walls
Step 2: Create the Lantern Walls
Stand the frames upright on their edges.
Arrange them into a square box shape.
Apply wood glue along the touching edges and carefully press them together.
Use clamps or painter’s tape to hold everything in place while the glue dries.
Allow the glue to cure according to the manufacturer’s instructions.
Pro Tip
For extra strength, add small corner braces inside the lantern where they won’t be visible.
Step 3: Add the Bottom Base
Measure the outside dimensions of your newly formed frame box.
Cut a square piece of wood slightly larger than the lantern.
Center the lantern on the wood base and glue it securely.
This base adds stability and gives the lantern a professional finished appearance.
Step 4: Build the Top Section
Cut another square piece of wood for the lantern roof.
You can:
- Leave it flat for a modern look
- Add trim pieces for a farmhouse style
- Create a slightly raised cap for a traditional lantern appearance
Glue the top securely onto the lantern.
Step 5: Add Decorative Details
This is where the lantern truly comes to life.
Popular additions include:
Rope Handles
Attach thick jute rope to create a rustic carrying handle.
Metal Rings
Install decorative black metal ring pulls for a vintage farmhouse look.
Corner Trim
Add thin wood strips to create a more finished appearance.
Distressing
Lightly sand corners after painting for a weathered antique effect.
Step 6: Paint or Stain
Choose a finish that complements your porch décor.
Popular Colors
- Dark walnut stain
- Weathered gray
- White farmhouse finish
- Matte black
- Natural oak
Apply 1–2 coats and allow proper drying time.
Finish with a protective sealer if the lantern will be exposed to outdoor conditions.
Step 7: Add Lighting
Place a candle inside your lantern.
For safety, LED candles are recommended.
They provide:
- Realistic flickering light
- No fire risk
- Longer lifespan
- Safe outdoor use
You can also add:
- Fairy lights
- Solar lights
- Battery-operated lantern lights
Styling Ideas for Your Front Porch
Farmhouse Style
Pair lanterns with:
- Wooden rocking chairs
- Galvanized planters
- Seasonal wreaths
Coastal Style
Add:
- Seashells
- Driftwood accents
- Whitewashed finishes
Fall Display
Fill lantern bases with:
- Mini pumpkins
- Pinecones
- Autumn leaves
Holiday Décor
Wrap with:
- Evergreen garlands
- Red ribbons
- String lights
Why DIY Lanterns Look So Expensive
The clean geometric design, natural wood texture, and warm candlelight create the same upscale look found in premium home décor stores.
Many similar lanterns sell for $40–$100 each, while this DIY version can often be made for under $15 depending on the materials used.
Final Thoughts
This picture-frame lantern project proves that beautiful home décor doesn’t have to be expensive. With a few inexpensive wooden frames, some glue, and a little creativity, you can create elegant lanterns that instantly transform a plain front porch into a warm and welcoming space.
Whether you make one statement piece or a matching pair like the lanterns shown in the image, the result is a timeless decoration that you’ll enjoy year after year. The hardest part may be convincing visitors that you made them yourself!
