Orchids are often seen as the crown jewels of the plant world, admired for their stunning, intricate flowers and the elegance they bring to any space. However, many orchid lovers struggle to get their plants to bloom consistently. The secret lies in the right care and, more importantly, the right fertilizer. With just one tablespoon of a powerful, balanced fertilizer, you can unlock your orchid’s full blooming potential, ensuring it blooms non-stop. In this guide, we’ll dive into why orchids need special care, how one tablespoon of the right fertilizer makes all the difference, and how to use it to get continuous flowers.
Why Orchids Need Special Fertilizer
Unlike typical houseplants, orchids grow differently. Most orchids are epiphytes, meaning they grow on trees or other structures in their natural habitat, deriving nutrients from the air and rain. This unique growth pattern means that they require specific nutrients, and their roots can be easily damaged by overfeeding. Orchids don’t need much fertilizer, but they need it in the right proportions to thrive. This is why using just one tablespoon of the best orchid fertilizer can lead to impressive, long-lasting blooms.
- Best orchid fertilizer
- How to make orchids bloom non-stop
- Orchid plant care tips
- Nutrients for orchids
- Orchid fertilizer tips
How Fertilizing Works: The Magic Formula
Fertilizing orchids provides them with essential nutrients like nitrogen, phosphorus, and potassium. However, not just any fertilizer will work. The best orchid fertilizers contain a balanced ratio of these nutrients, often labeled as 20-20-20 or something similar. The key nutrients include:
- Nitrogen (N): Promotes leaf growth.
- Phosphorus (P): Vital for root development and flower production.
- Potassium (K): Strengthens overall plant health and supports blooms.
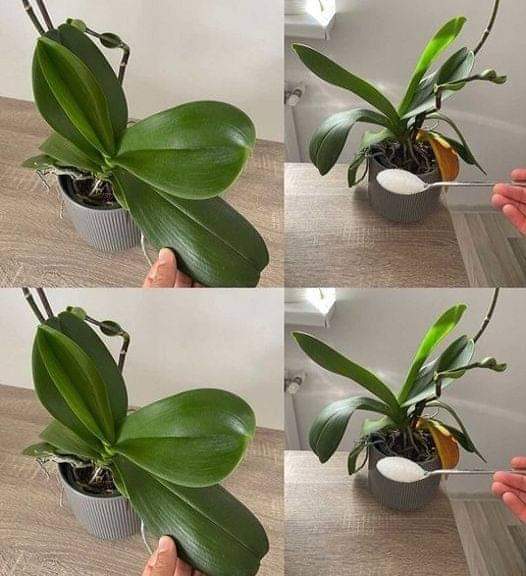
For orchids to bloom continuously, the fertilizer should ideally have a slightly higher phosphorus content, especially during blooming periods. This will encourage the plant to produce flowers rather than just leaves. Applying a one-tablespoon dose mixed with a gallon of water is often all that’s needed for spectacular, non-stop blooming.
Why One Tablespoon?
You might wonder, why just one tablespoon? Orchids are sensitive to overfeeding, and their roots are prone to “nutrient burn” if too much fertilizer is applied. Using more fertilizer doesn’t lead to more blooms; in fact, it can have the opposite effect, stunting the plant or damaging its roots. That’s why using the right amount is crucial.
By giving your orchid a small but concentrated dose of nutrients, you allow it to absorb what it needs without overwhelming it. This is why high-quality fertilizers recommend just one tablespoon per gallon of water—a perfect amount for orchids to thrive.
Feeding Orchids: Best Practices for Non-Stop Blooms
Feeding your orchids correctly is key to achieving those beautiful, continuous blooms. A few simple steps will ensure your orchids stay healthy, strong, and full of vibrant flowers.
How to Apply the Fertilizer
- Dilute Correctly: Mix one tablespoon of orchid fertilizer with a gallon of water. Make sure it’s thoroughly dissolved.
- Water Before Fertilizing: Always water your orchid first. This helps prevent root burn and allows the fertilizer to be absorbed more effectively.
- Frequency: Apply the fertilizer weekly but remember the mantra “weakly, weekly.” Orchids don’t need a strong fertilizer dose—diluted is best.
- Flush Monthly: Once a month, flush the pot with plain water to remove any salt buildup that might accumulate from the fertilizer.
By following this feeding schedule, you’ll provide your orchid with all the nutrients it needs to bloom continuously throughout the year.
Orchid Blooming Secrets: Unlocking Non-Stop Flowers
The right fertilizer isn’t the only factor in getting your orchids to bloom non-stop, but it’s one of the most important. Here are some additional care tips to help you make the most of your fertilization routine and ensure continuous flowering.
1. Proper Light
Light is essential for orchids. They thrive in bright, indirect light, making east-facing windows ideal. If your orchid isn’t blooming, it might not be getting enough light. Too much direct sunlight can scorch the leaves, so be sure to strike the right balance.
2. Humidity Levels
Orchids love high humidity, around 50% to 70%. If your home is too dry, consider using a humidity tray or a room humidifier. Keeping humidity levels up helps replicate the orchid’s natural environment, encouraging more frequent blooming.
3. Watering Schedule
Orchids don’t like to sit in water. Overwatering can lead to root rot, which is deadly for orchids. Water your orchid once a week, allowing the potting mix to dry out between waterings. If you’re using the fertilizer solution, water before you feed it to protect the roots.
4. Potting Medium
Use a well-draining orchid mix, often made from bark, perlite, or sphagnum moss. This medium allows air to circulate around the roots, mimicking the orchid’s natural environment. Good drainage is essential to prevent root rot and other moisture-related issues.
Choosing the Best Orchid Fertilizer
When selecting a fertilizer, look for ones specifically labeled as orchid fertilizers. These formulas are designed with the plant’s specific nutrient needs in mind. Here are some types to consider:
- Balanced Orchid Fertilizer (20-20-20): Perfect for maintaining general plant health and consistent blooming.
- Bloom-Boosting Fertilizer (10-30-20): Higher in phosphorus, this fertilizer encourages more flowers during the blooming season.
- Organic Orchid Fertilizer: These are often made from natural sources like seaweed extract or fish emulsion and provide gentle, long-lasting nutrients.
Be sure to choose a fertilizer that fits your orchid’s needs and follow the recommended application instructions closely.
Troubleshooting Common Orchid Fertilizing Problems
Even experienced orchid growers can face challenges when fertilizing. Here are some common issues and how to fix them:
- Yellow Leaves: This could indicate too much fertilizer or a nitrogen imbalance. Reduce the fertilizer dosage and check for overwatering.
- No Blooms: If your orchid isn’t blooming, it may need more light or a bloom-boosting fertilizer.
- Burnt Leaf Tips: This is often caused by fertilizer burn, which happens when too much fertilizer is applied. Flush the pot with plain water and reduce the concentration of your fertilizer mix.
The Benefits of Using the Right Fertilizer
Orchids that are properly fertilized show stronger root development, healthier leaves, and longer-lasting blooms. The one-tablespoon method ensures you don’t overfeed your plant, which could lead to nutrient burn or other health issues. When used in combination with good orchid care practices, the right fertilizer will give you the non-stop blooming you’ve always wanted.
Key Benefits of the Right Fertilizer:
- Stronger blooms: More vibrant and longer-lasting flowers.
- Healthy roots: Improved root development and resilience.
- Continuous flowering: Encourages year-round blooming cycles, especially in Phalaenopsis and other common orchids.
Conclusion: Unlocking Non-Stop Blooms with One Tablespoon of Fertilizer
Orchids, with their unique beauty and captivating flowers, deserve the best care. By using just one tablespoon of the best orchid fertilizer, you can give your plant everything it needs to bloom non-stop. Combine this with the right light, humidity, and watering schedule, and you’ll be rewarded with continuous blooms and a thriving, healthy orchid.
Whether you’re a seasoned orchid grower or just starting, understanding the power of proper fertilization will make all the difference in keeping your orchid blooming all year round. So the next time you reach for that fertilizer, remember—one tablespoon is all it takes for stunning, non-stop blooms.
