#8. Cup-Dome Propagation Greenhouse
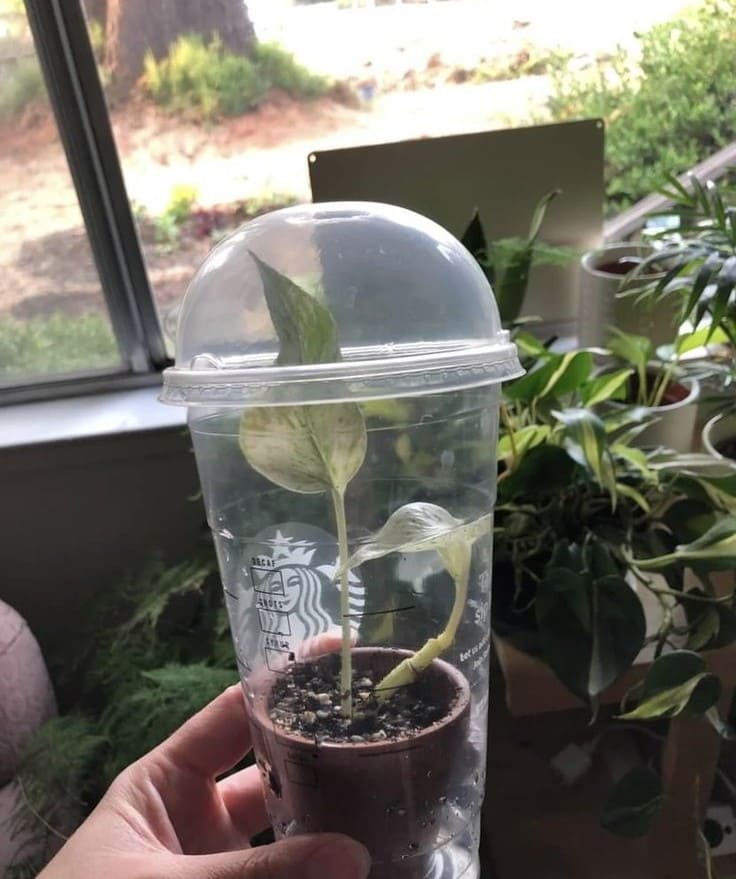
This simple yet brilliant little dome setup uses a clear plastic cup and lid to create the perfect humid environment for propagating cuttings. It keeps moisture in, light flowing, and pests out, all while sitting snugly on your windowsill.
Materials Needed:
- 1 clear plastic cup with dome lid (vent hole optional)
- 1 small nursery pot
- Potting mix
- Plant cutting
Step-by-step Guide:
Step 1: Place your cutting in a small nursery pot filled with moist soil or propagation mix.
Step 2: Carefully lower the pot into the clear cup.
Step 3: Cover with the dome lid to trap humidity and warmth.
Step 4: Set it by a bright window and watch your little cutting root with joy. Open the lid every couple of days for airflow.
#9. Zip-Up Clear Bag Greenhouse
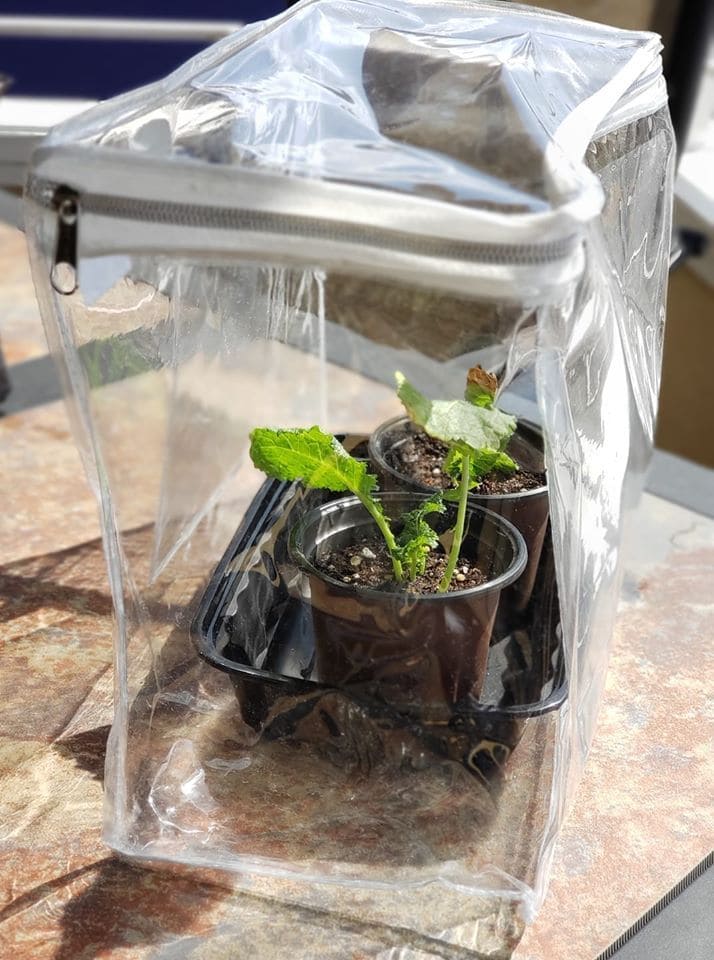
When your seedlings need a little extra warmth and you’re short on space (or time), a clear zip-up toiletry bag works wonders.
This no-fuss mini greenhouse traps heat and humidity like a charm, perfect for balcony growers or anyone starting tender greens indoors.
Materials Needed:
- 1 clear zippered plastic toiletry bag
- 2–4 small starter pots
- 1 shallow plastic tray
Step-by-step Guide:
Step 1: Arrange your seedling pots in a tray that fits neatly inside the bag.
Step 2: Zip the bag three-quarters closed, leaving a little space for airflow.
Step 3: Set the setup in a sunny location where it gets consistent light. Open the zipper wider on warmer days to avoid overheating and zip it back up overnight to retain moisture.
#10. Milk Jug Mini Greenhouses
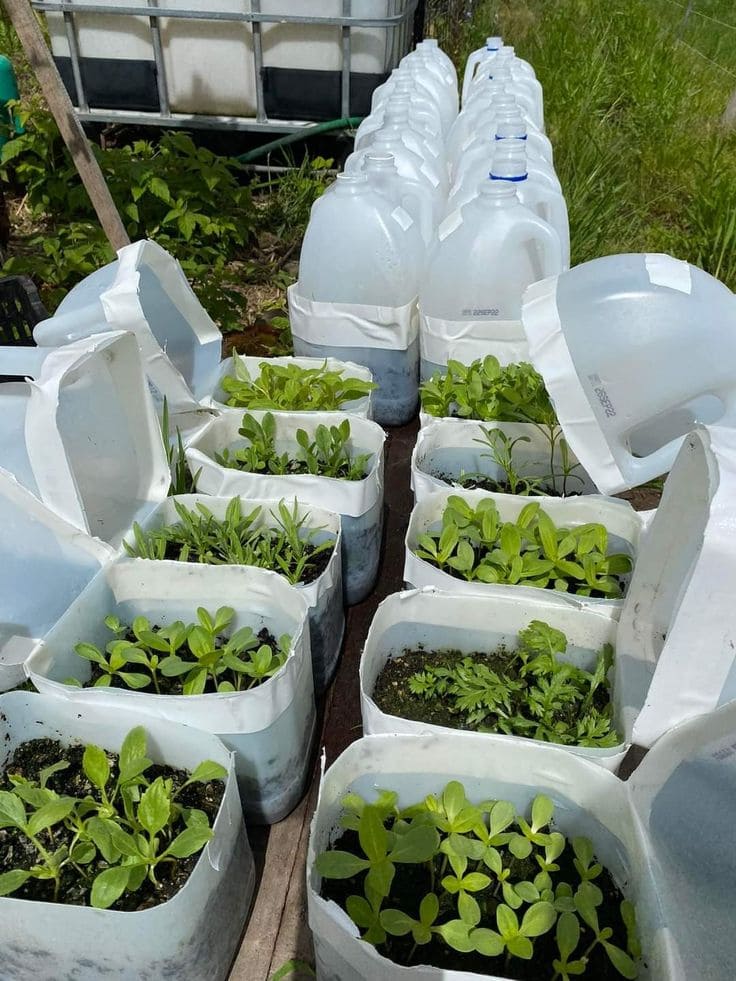
Repurposed milk jugs make brilliant mini greenhouses for winter sowing or early spring planting.
They hold in warmth, protect seedlings from wind, and give you a head start on the growing season, all from what would’ve ended up in the recycling bin.
Materials Needed:
- Empty 1-gallon milk jugs (cleaned and labels removed)
- Potting soil
- Seeds or seedlings
- Utility knife
- Duct tape
Step-by-step Guide:
Step 1: Cut each milk jug horizontally around the middle, leaving one side attached like a hinge.
Step 2: Fill the bottom half with soil and sow your seeds.
Step 3: Close the top half over and tape it shut, leaving the cap off for ventilation.
Step 4: Place the jugs outside in a sunny spot and let nature do the work. Open them up when temps rise or seedlings need thinning.
#11. Barrel-Top Cage Greenhouse for Climbing Veggies
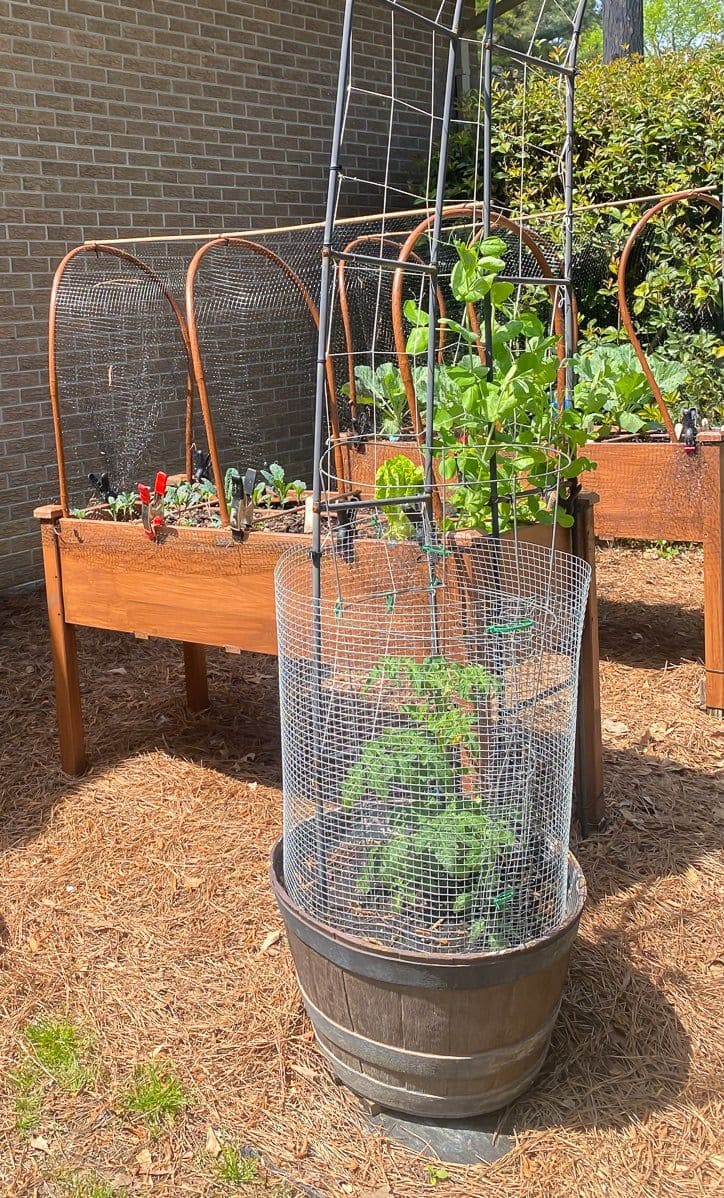
You don’t need a giant structure to give your tomatoes or peas the VIP treatment. This clever mini greenhouse-in-a-barrel protects young plants from critters while giving them room to grow up.
Materials Needed:
- 1 large wooden barrel planter
- Galvanized wire mesh (approx. 24–30″ tall)
- Garden arch trellis
- Zip ties
Step-by-step Guide:
Step 1: Place the trellis or metal frame into the barrel and press firmly into the soil.
Step 2: Wrap the wire mesh around the edge of the barrel, forming a protective cylinder.
Step 3: Use zip ties to secure the mesh to the trellis structure for stability.
Step 4: Plant your seedlings inside and let them climb their way up with the sun cheering them on.
#12. Mesh-Laundry Basket Mini Greenhouses
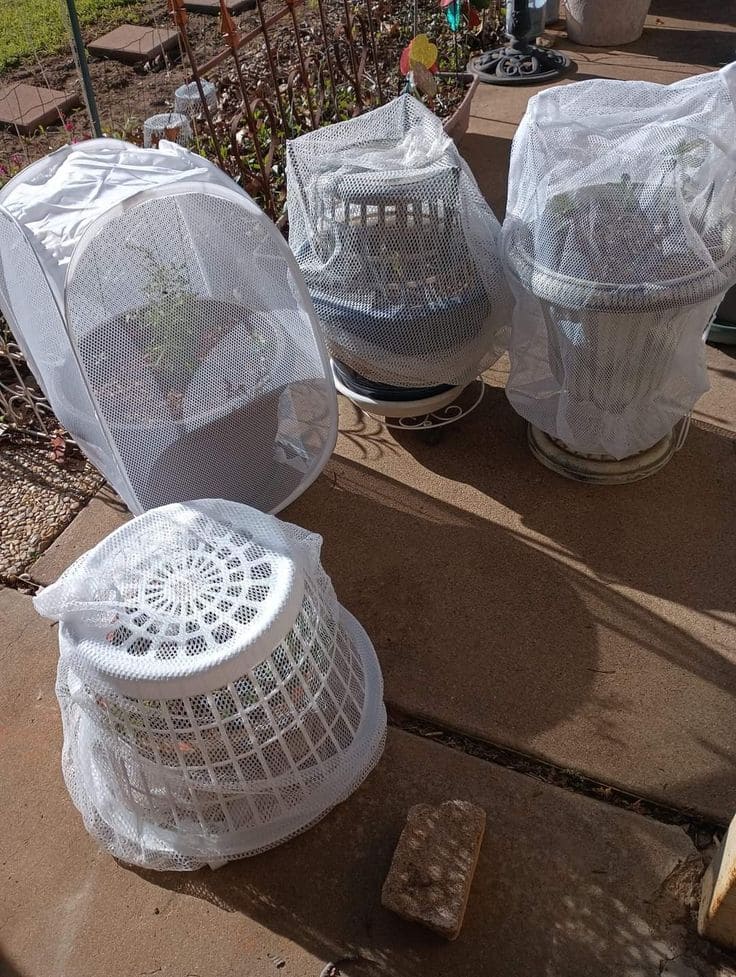
If bugs and birds are always beating you to your seedlings, here’s a fix that’s wonderfully simple: laundry baskets and mesh hampers turned into tiny plant protectors.
These upcycled covers keep pests out, let sunlight and air in, and cost next to nothing.
Materials Needed:
- Mesh pop-up laundry hampers or baskets (1 per plant)
- Lightweight mesh fabric
- Twist ties, clothespins, or garden clips
- Optional: bricks or stones
Step-by-step Guide:
Step 1: Place the mesh hamper or basket over each potted plant or garden bed section.
Step 2: If using an open laundry basket, drape mesh fabric over it and secure with clips.
Step 3: Add a brick or stone around the base to hold everything in place on windy days.
#13. Strawberry Net Dome Greenhouses
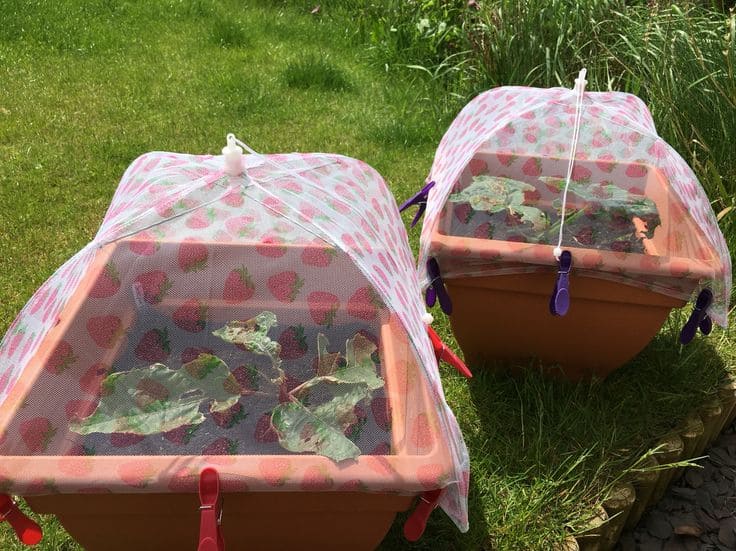
Sometimes, the cutest solutions are also the smartest. These DIY mini greenhouses use strawberry-print netting and plastic clips to shield young plants from hungry pests while letting in sunshine, rain, and air.
Materials Needed:
- 2 rectangular garden planters
- Lightweight mesh fabric (approx. 1 yard per planter)
- 2 flexible rods
- 6–8 clothespins
Step-by-step Guide:
Step 1: Insert two flexible rods into opposite corners of each planter, forming an X-frame arch.
Step 2: Drape mesh fabric over the arch and adjust until evenly covered.
Step 3: Clip the mesh securely to the planter edges using clothespins.
Step 4: Set your planters in a sunny spot, and let your plants grow safe and sound under their playful domes.
#14. Rustic Lift-Top Greenhouse Frame
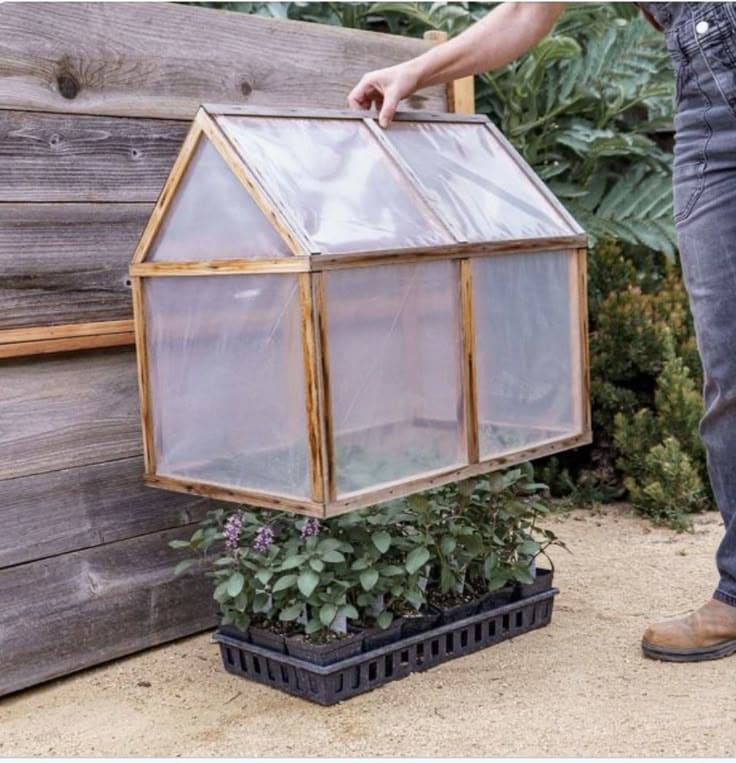
Ever found yourself wishing you could give your young plants a little cottage of their own? This charming lift-top mini greenhouse does exactly that.
Materials Needed:
- 1 wooden frame (approx. 2×3 ft) with a peaked roof shape
- Clear plastic sheeting
- Small hinges and screws (optional)
- Potting trays
Step-by-step Guide:
Step 1: Build a lightweight wooden frame, shaped like a small house.
Step 2: Staple or tack clear plastic onto the wood to fully enclose the structure.
Step 3: Place your seedlings or herbs in trays beneath the cover.
Step 4: On sunny days, lift or prop up one side for airflow and to avoid overheating.
#15. Cone Bottle Cloches for Young Plants
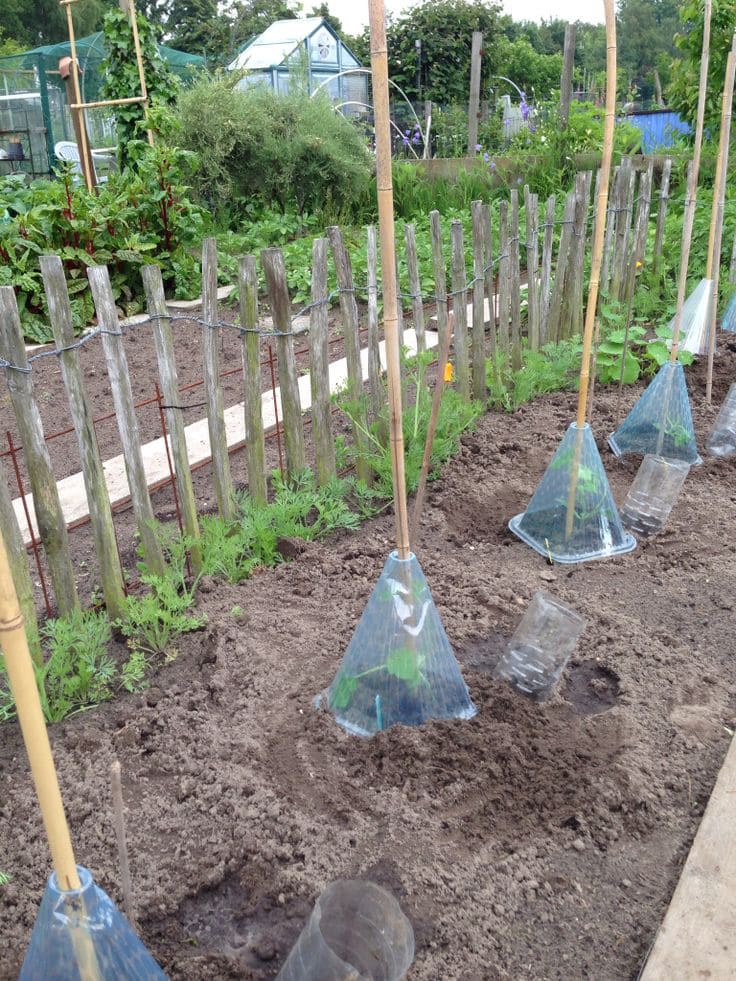
These DIY cone cloches made from plastic bottles are like giving each seedling its own tiny greenhouse helmet—lightweight, breathable, and sturdy enough to hold on during rough weather.
Materials Needed:
- Clear plastic bottles (1.5L or 2L)
- Sharp scissors
- Garden stakes
- Optional: small zip ties
Step-by-step Guide:
Step 1: Cut the bottoms off your plastic bottles, keeping the cone shape intact.
Step 2: Slide a bottle cone over each plant, securing the tip with a bamboo stake for support.
Step 3: Use a small clip or zip tie to fasten the bottle to the stake if needed. Lift the cover occasionally to air out or water the seedlings.
#16. Dome Netting Greenhouse Buckets
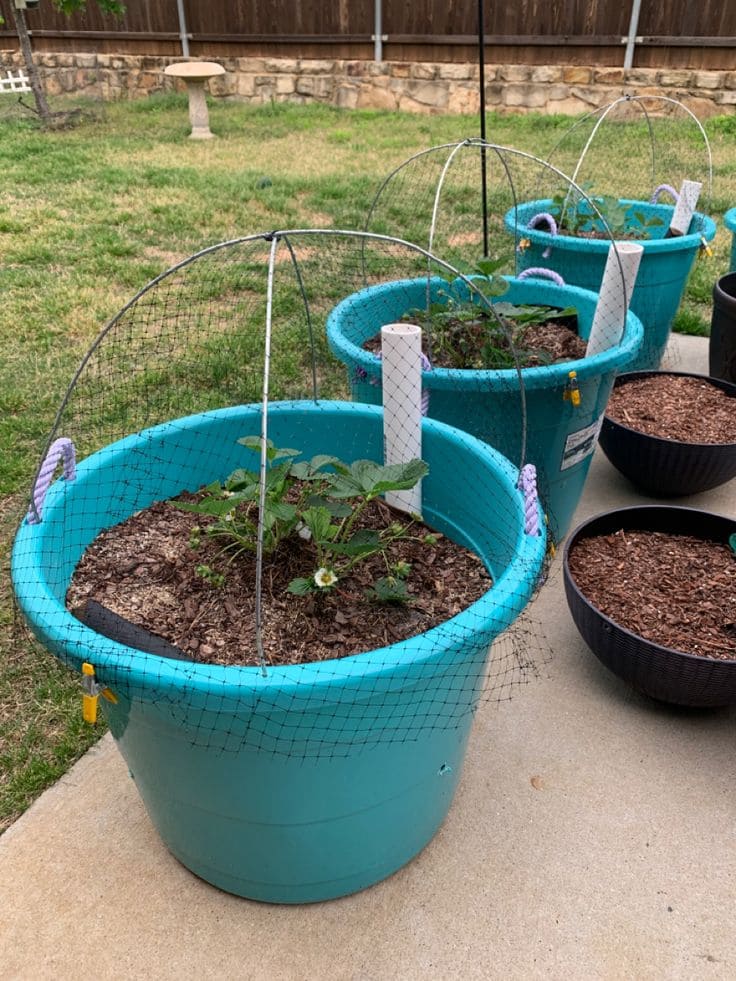
Using a few flexible rods and a bit of netting, you can turn an everyday storage tub into a protective dome that’s simple, sturdy, and surprisingly charming.
Materials Needed:
- Large plastic storage bucket (approx. 18–20 gallons)
- 3–4 flexible PVC
- Garden netting (about 2×2 ft. per bucket)
- Clips
- Optional: PVC pipe insert
Step-by-step Guide:
Step 1: Insert rods across the bucket rim, forming an arched dome.
Step 2: Drape netting over the top, making sure it covers the entire planting area.
Step 3: Clip the netting securely to the bucket rim to hold it in place.
Step 4: Add a vertical pipe to water at the root zone if needed, and place your bucket greenhouse in full sun.
#17. Raised Bed Net-Cover Greenhouse
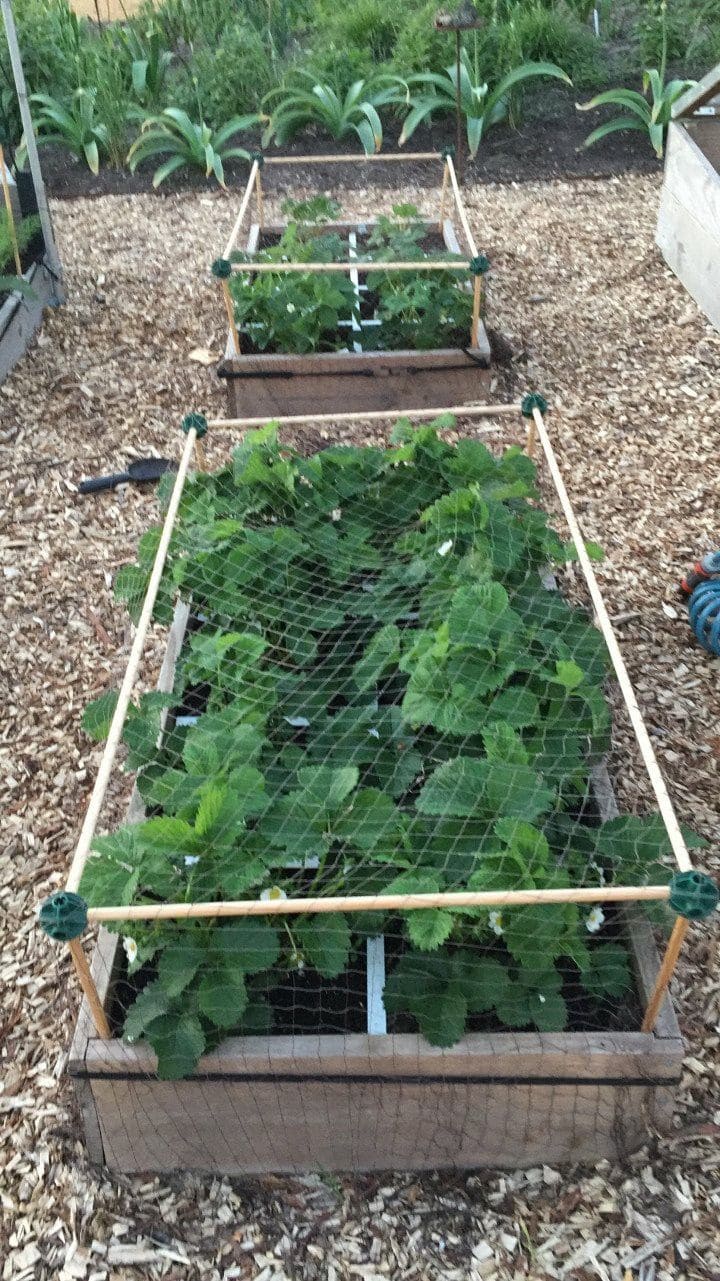
If you’ve ever watched birds peck at your hard-earned strawberries or squirrels treat your lettuce like a buffet, you know how frustrating it can be. This DIY net greenhouse turns your raised bed into a sanctuary.
Materials Needed:
- Raised garden bed (any size)
- Plastic garden stakes (4 or more, 2–3 ft tall)
- Bamboo dowels (length varies by bed size)
- Garden netting
- Zip ties
Step-by-step Guide:
Step 1: Insert stakes into each corner of the raised bed.
Step 2: Attach horizontal dowels across the top using zip ties to form a rectangular frame.
Step 3: Drape the netting over the entire frame, ensuring it covers all sides. Then secure the bottom edges of the netting to the bed or into the soil to keep critters out.
#18. Salad Container Greenhouse
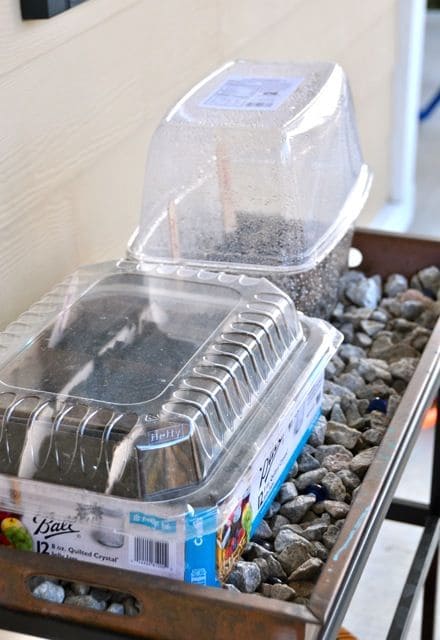
Don’t toss that plastic clamshell after your grocery run as your seedlings will thank you for it.
These clear produce containers create the perfect humid environment for starting seeds, especially when the weather can’t make up its mind.
Materials Needed:
- Plastic clamshell containers (like from salad mixes or pastries)
- Potting mix
- Small pots, seed trays, or the base of the container
- Spray bottle
Step-by-step Guide:
Step 1: Clean the container and poke a few small drainage holes in the bottom.
Step 2: Fill it with soil and sow your seeds as instructed on their packets.
Step 3: Mist the soil gently and close the lid to trap moisture. Then place in a sunny, sheltered spot and vent slightly on warm days to avoid overheating.
#19. Cardboard Tabletop Greenhouse
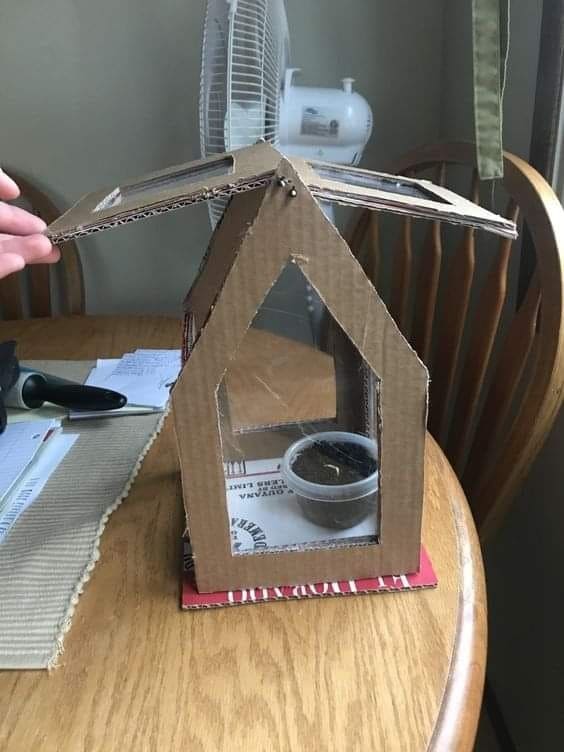
Crafted from recycled cardboard and clear plastic packaging, it’s a creative solution for anyone nurturing delicate seedlings by the window.
It feels surprisingly heartwarming to watch life begin inside something so simple and handmade.
Materials Needed:
- Cardboard (at least 4 sturdy panels, approx. 8″ x 10″)
- Clear plastic sheets
- Hot glue gun and glue sticks
- Craft knife
- Hinges
- Ruler and pencil
Step-by-step Guide:
Step 1: Cut cardboard into panels: two side walls with triangular peaks, two rectangles for front/back, and one base.
Step 2: Cut windows into each panel and glue clear plastic behind each opening.
Step 3: Assemble the walls using hot glue, attaching them to the base.
Step 4: Create a sloped roof from two cardboard pieces, hinged with tape or glued to open like a lid.
Step 5: Place your seedling inside and set it in a sunny spot. This structure holds warmth while allowing light and air to flow perfect for early-stage growth.
#20. Chicken Wire Cloche Frame
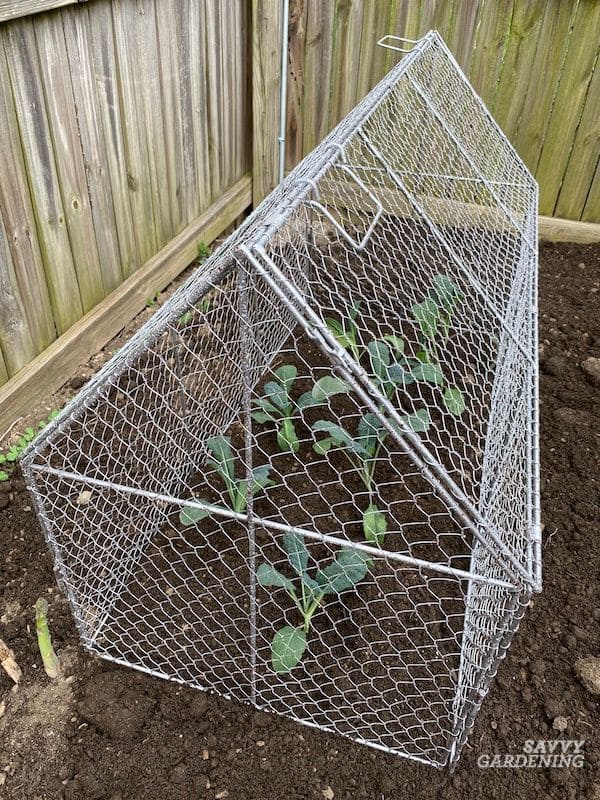
If cabbage worms or curious squirrels have ever made your garden their playground, this DIY chicken wire greenhouse will feel like building a protective fortress.
It’s practical, sturdy, and perfect for shielding leafy greens or seedlings without blocking out sunlight or airflow.
Materials Needed:
- Chicken wire (approx. 4–6 ft roll, standard mesh size)
- 8 metal rods
- Wire cutters
- Zip ties
- Gloves
Step-by-step Guide:
Step 1: Cut chicken wire panels to size, two rectangles for the sides and two triangles for the roof ends.
Step 2: Shape and assemble the pieces into a house-like frame using zip ties or twist wire to secure edges.
Step 3: Form a pitched roof by connecting angled panels at the top.
#21. DIY Tabletop Greenhouse Using a Recycled Crate
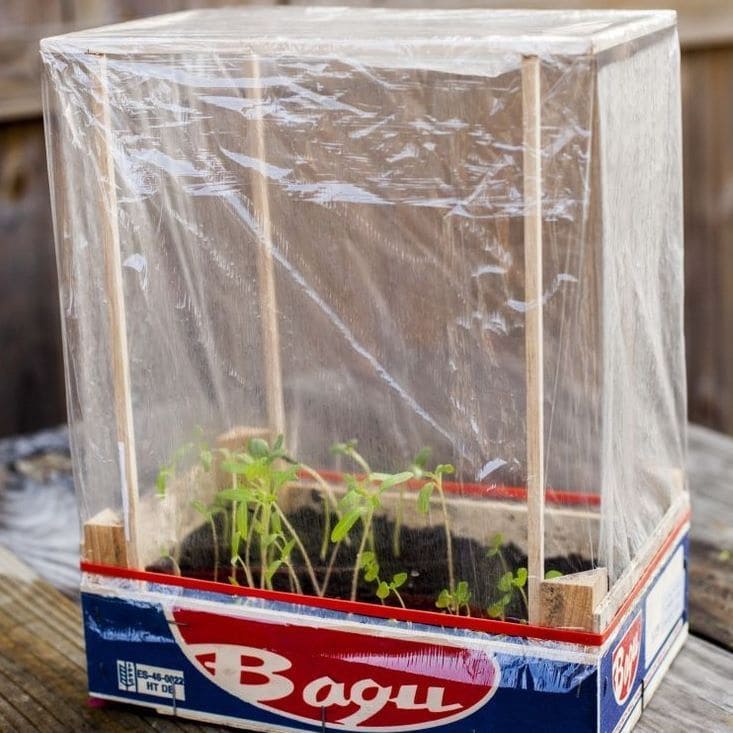
There’s a quiet joy in giving seedlings a head start, especially when you can do it with scraps you already have at home.
This simple, clear-plastic-covered greenhouse makes use of a recycled produce box, and it’s just the right size for starting herbs or baby greens on a porch or patio table.
Materials Needed:
- 1 sturdy cardboard produce crate or wooden fruit box (approx. 12″x18″)
- 4 wooden dowels (each 12–18″ tall)
- Clear plastic wrap
- Stapler
- Potting soil and seedlings
Step-by-step Guide:
Step 1: Fill the crate with potting soil or place starter pots inside it.
Step 2: Insert dowels vertically in each corner to form a tent-like frame.
Step 3: Wrap the plastic sheet around all sides and over the top, securing it tightly with staples or tape. Leave a small flap or slit for ventilation and watering.
#22. Repurposed Bread Box Mini Greenhouse
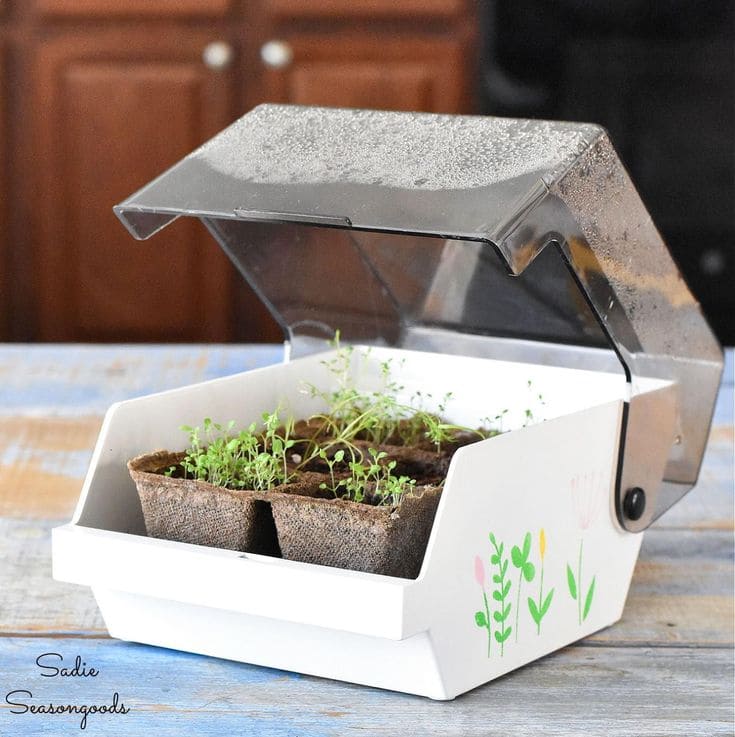
Who knew your forgotten kitchen bread box could nurture baby basil and thyme?
This clever mini greenhouse idea uses a vintage-style bread container with a clear lid, perfect for letting in just enough light while trapping warmth and moisture.
Materials Needed:
- 1 vintage or plastic bread box with a flip-up clear lid
- Seedling trays (approx. 3–4 small trays)
- Potting soil
- Water spray bottle
Step-by-step Guide:
Step 1: Place your seed trays or pots filled with moistened soil inside the bread box.
Step 2: Sow your seeds according to their depth needs, then lightly mist the surface.
Step 3: Close the lid to create a humid, cozy microclimate for germination. Open slightly each day for airflow and to prevent mold buildup.
